So it has taken me over three months of procrastination of building a USBIP image that will let me connect to my 3D printer wirelessly to actually writing up a tutorial to share it with the world. This tutorial provides the basics of setting up a fresh TP-Link TL-WR703N image to wirelessly connect a Windows machine to a USB device attached to the router. I am using primarily using this to connect to my pp3dp Up! printer (only reason this is for Windows…), but I have also tested this method on a USB Logitech webcam and a USB flash disk.
Again, a disclosure is that I am an affiliate to 3D printing systems and that if you’re interested in buying an Up! Plus or Up! Mini and you’re in Australia/New Zealand you should do it via this link 😛
Setting up the router
- Download and install the USBIP image as per my TP-Link TL-WR703N page.
- Connect a wired Ethernet cable to router and browse to http://192.168.1.1/
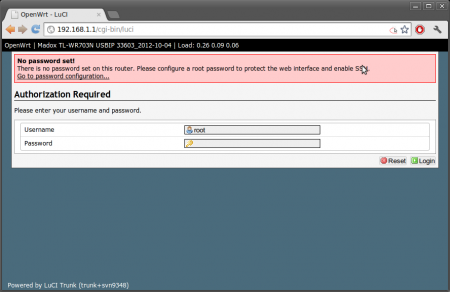
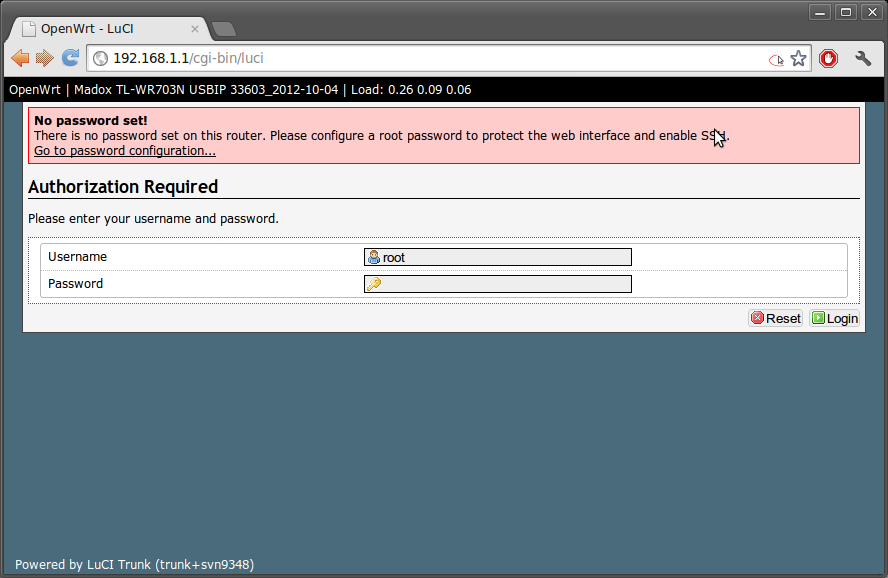
Fresh USBIP image - Press “Login”, then select the “Network” tab at the top, then select “Wifi”

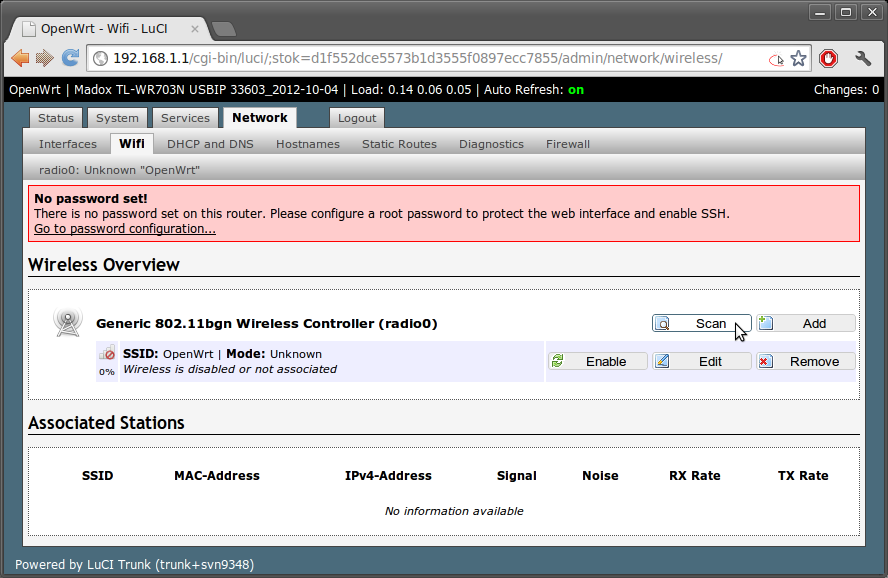
Configuring the WiFi of the router 1 - Click “Scan”.
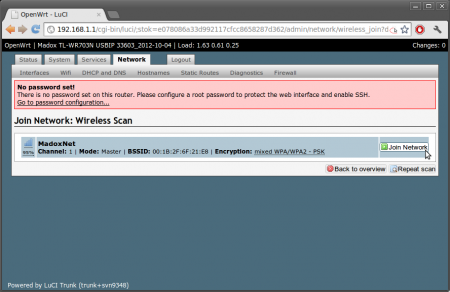
Configuring the WiFi of the router 2 - Find your Wifi AP and click “Join Network”
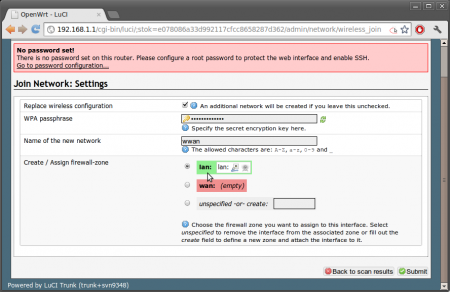
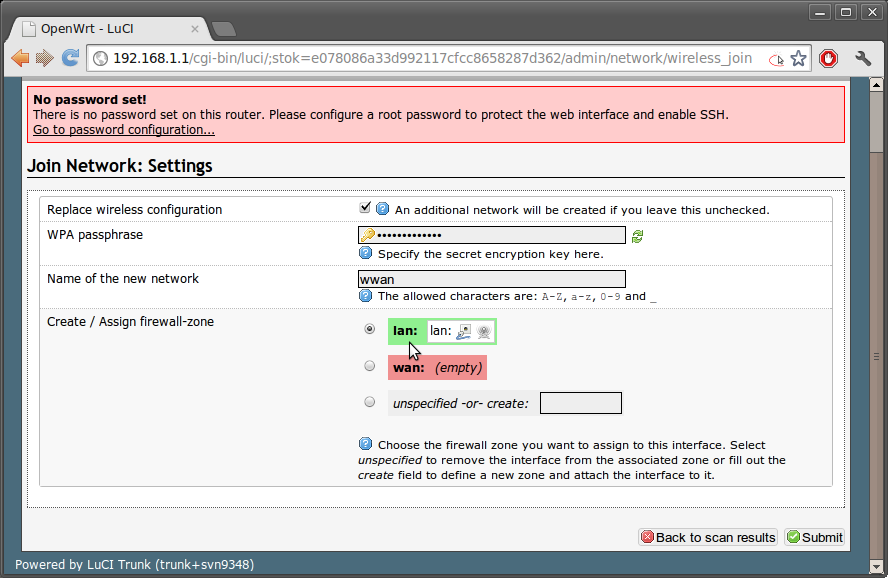
Configuring the WiFi of the router 3 - Enter your WPA passphrase(assume you’re using WPA/WPA2), and under “Create / Assign firewall-zone” – select “lan” then click submit.
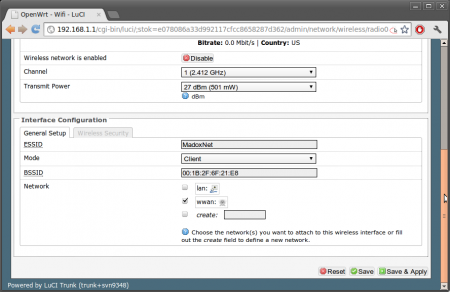
Configuring the WiFi of the router 4 - Click “Save & Apply” and then wait for changes to be applied.
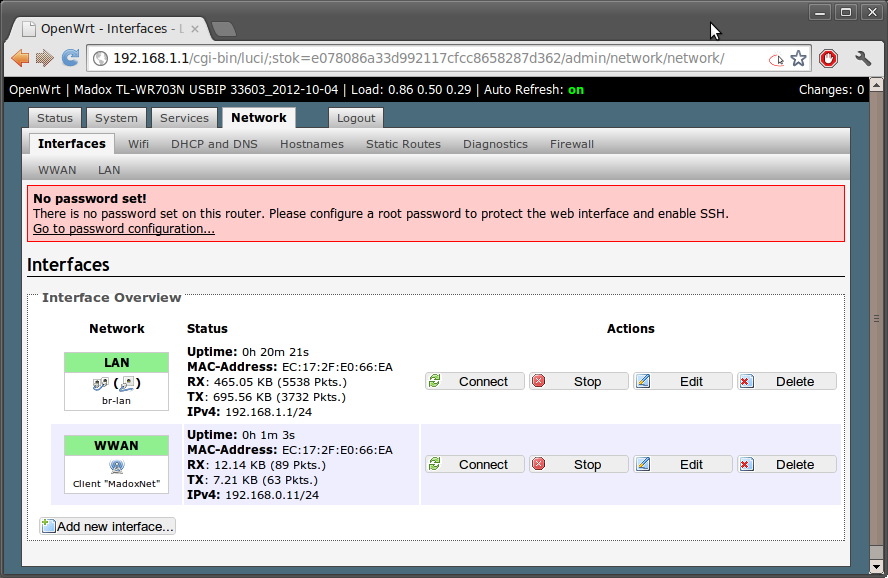
- Under the “Network” tab at the top, select “Interfaces”Note the IP address of the WWAN connection. In my example below, it is 192.168.0.11.
NOTE : Recommended, if you can set up your WiFi to assign a static IP to the WR703N router based on MAC address – do it. It makes life easier 🙂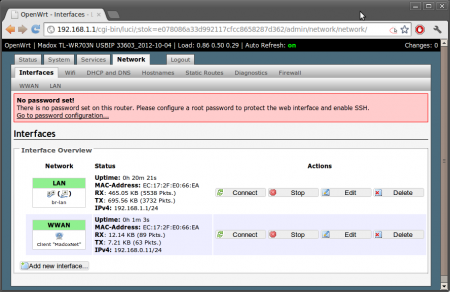
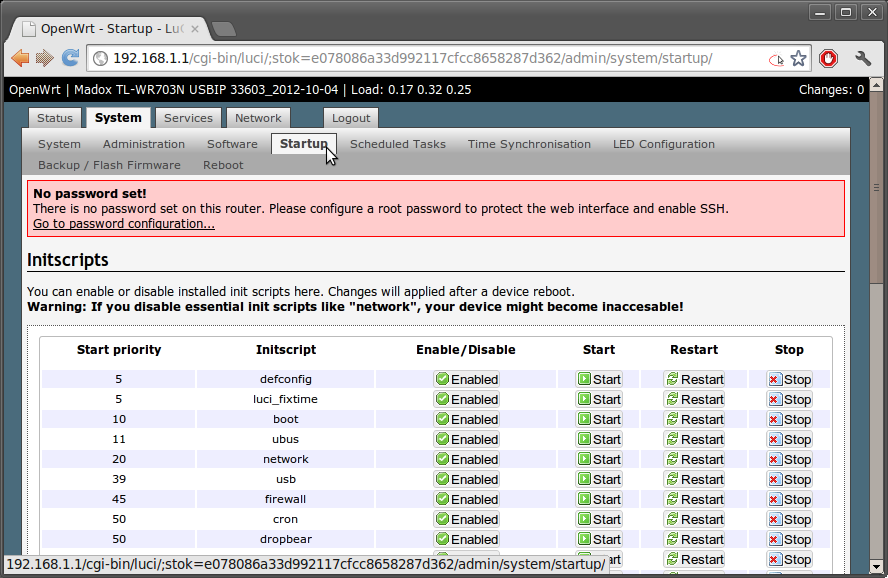
Checking the IP address of the router - Select the “System” tab at the top,then select “Startup”
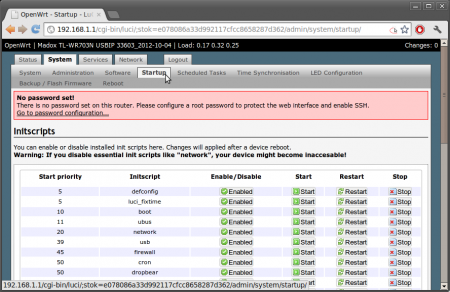
Getting ready to edit startup files - Scroll down to the bottom to see a section titled “Local Startup”
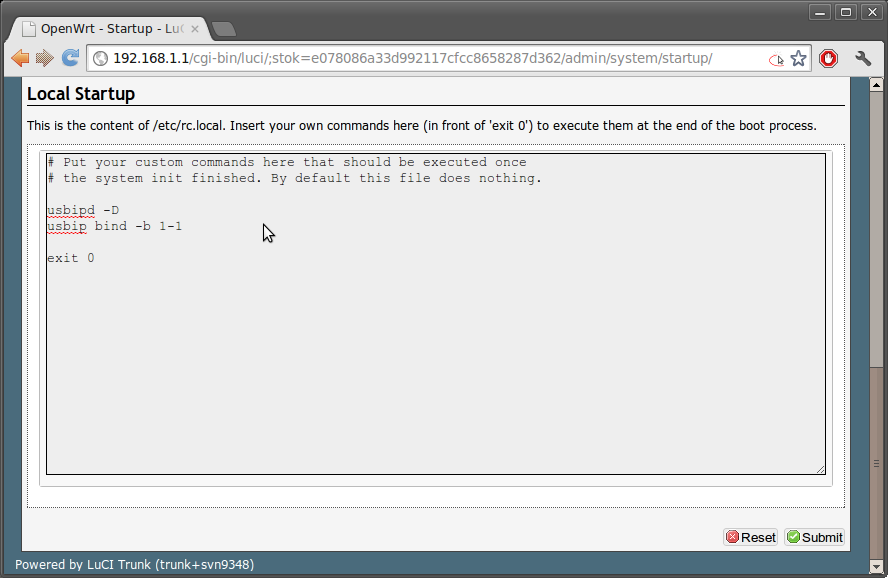
- Add the following lines to the file as pictured
usbipd -D
usbip bind -b 1-1
Inserting the USBIP startup code - Click submit
- NOTE : (Optional but recommended) Remember to set the password for the router’s web interface, follow the on-screen prompts!
- Ensure the Up! printer [Or other USB device] is powered on and connected to the router’s USB port.
- Power cycle the router


Setting up the Windows PC
- On the Windows PC, download the USBIP client from
http://sourceforge.net/projects/usbip/files/usbip_windows/usbip_windows_v0.2.0.0_signed.zip/download - Unzip the file and follow the instructions in USAGE for your particular version of windows
NOTE : It is recommended you unzip to a nice short path, I used d:\usbip_windows_v0.2.0.0_signed - Open up a command window (Click the Start Button, Run, type in “cmd” then press enter)
- Navigate the the nice short path you’ve unzipped the USBIP client to 😛 e.g.
d:
cd d:\usbip_windows_v0.2.0.0_signed - Run the command
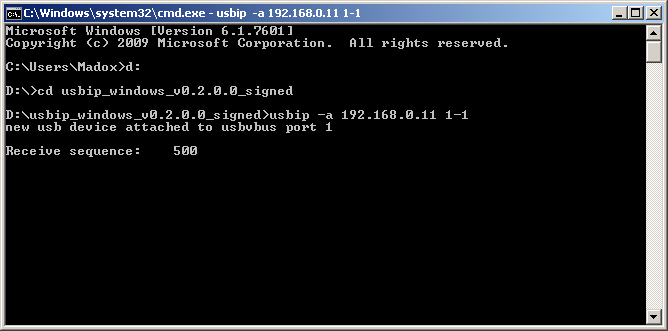
usbip -a 192.168.0.11 1-1Of course, replace the IP address with your own one noted in Step 8 of the router section above.NOTE : This is where firewall dialog screens might pop up, allow it (USBIP) through!
NOTE : Recommended, set up a batch script to run this command… again it makes life easier 🙂
- If successful you should hear the Windows sound for the USB device connection and your dialog should look like the following with a “Receive sequence: …” number that increases when the USB device is in use.

Connect to the router’s IP address using USBIP - Test your device/printer. Yup, my printer is visible from downstairs (printer is upstairs). Oh yes I’m using an old Up! software…if it aint broke I aint upgrading it!

All good! Wireless USB working

Short Explanations…
Hope you managed to get it all working. Most of the instructions in the router section is basic WiFi configuration, feel free to adapt it to your own needs. The main component is steps 9 through 11 where adding the two lines starts up the USBIP daemon, and binds the first USB device to USBIP. Yup, the above only works for a single device connected to the USB port. Since the TL-WR703N only has one port, this shouldn’t be a problem in most cases. However if you’re using a USB hub, then you might need to change some stuff…
If you connect to the router via telnet/ssh after the daemon has been loaded (“usbipd -D”) then you can run “usbip list -l“. This lists out all the connected devices on the USB bus and their handles. e.g. If I only had my Up! printer connected, then I would see (0475:0001) on bus 1-1. The codes 0475:0001 is the vendor ID and product ID of the Up! printer. So if you have multiple items on the router USB (not recommended) you’ll have to tweak the ‘bind’ line in the start-up file.
Also on my main project page, someone has suggested using the 0.1.0.0 version of the Windows client if the 0.2.0.0 fails to behave. Your mileage may vary with this one, I’ve only tried the 0.2.0.0 version.
Have fun! Enjoy!
Oh forgot to note, since the USBIP bind occurs only when the router is starting up the printer/USB device must be on before the router is. [Does not apply to USB powered devices of course].
Again, of course you can improve this yourself by writing up an udev rule 🙂
Looks great ! Since I don’t have (and don’t want) wireless network, it should work with the wired network too, right ?
Yes, it will work fine on the wired network – you just have to use the wired IP address. Note that by default the wired network is configured to be a DHCP server, you may have to change that to be a DHCP client if you’re connecting it to your home network.
Perfect, thanks Madox !
Hi I had a couple questions about this neat project.
First is I have a TP-Link MR3020 which is similar to your router, would this work on my router?
I have turned my MR3020 into a pirate box but I wish reset it to stock then try this.
And second is can this be used on a linux (Ubuntu) system?
My USBIP image is built for the WR703N and would not work for the MR3020. However it is rather simple to build an image for the MR3020. I will post up the recipes for the USBIP build, and you can see the small hack I had to put in place in order for it to work with the pre-built windows binaries. And yes, it’ll work on a Ubuntu / GNU/Linux system if you build USBIP for the hack…
Email me to remind me to post it hehe 😉
Any idea how well this works (particularly latency) with isochronous devices like a USB DAC?
I haven’t tried… 😉 Please try and let us know!
I thought it might be interesting. I have used usbip with another hardware 8devices carambola (based on Ralink chipset). I have configured connected Canon 40D DSLR camera with live preview. Check this out: http://lukse.lt/uzrasai/2013-01-wireless-dslr-camera-control-with-live-preview/
That’s neat, I didn’t know you had that much control through USB of a Canon camera…might poke a few of my Canon friends 😉
I’ve followed every step of the procedure (installed the usbip and its update firmware, setup the wireless, added init script, done the USAGE file steps). I still can’t get it to work with my laser printer and no go for my flash drive either. When I run the usbip -a [wireless ip] 1-1, it just gives me an error message:
usbip err: usbip_windows.c: 825 (attach_device) tcp connect
please HELP!!
Thanks for the tutorial.
I’ve followed all the procedure, but I keep getting the error message below:
usbip err: usbip_windows.c: 825 (attach_device) tcp connect
Anyone know what the message means? Thanks
Are you allowing it through your firewall? Try turning it off and trying it…then at least you’ve isolated to the firewall.
I just tried disabling the windows 7 firewall and still no go. Did you mean the routers’ (main and the tp-link) firewall?
a)Are you sure you’re using the right IP? Is it on the same subnet as your home network?
b)Did you make sure you’ve put the router’s network on the LAN firewall zone?
a) I’m sure I copied down the right ip since I also verified it on my main router’s Device List. The WANN subnet is different, but LAN subnet is the same.
b) yep
I read elsewhere where people were saying that the USBIP daemon may not be running in the TP Link (but I’m sure I added the init script and restarted the tplink). Is there a way to verify whether the daemon is running? I’ve downloaded the usbip-0.1.7.tar.gz and am figuring out how to install it.
Thanks for the INSTATNT SUPPORT!!!
Hmmmmm
Now I am confused –
1)Did you follow all the instructions on my page and actually using my image? I am confused because you mention USBIP 0.1.7, not sure where that came from.
2)I suggest you telnet/ssh into the router and start the daemon up yourself. You can of course use top/ps to check if the daemon is running. This also checks if you’ve got connectivity issues.
1) I did follow all the instructions on the usbip firmware installation page and this page. I downloaded that USBIP 0.1.7 afterward only because other people said the USBIP may not be working properly (sorry for the confusion)
2) Could you please advise what that top/ps is?
Thanks
Awesome article, could you please detail how you built your firmware? Please share your .config file for building this openwrt firmware. Any other secret sauce or custom config files?
Hi, the config file is included in each package (renamed). I’ve been a bad boy with the secret sauce and will upload them this weekend.
Secret Sauce is posted here : http://www.madox.net/blog/2013/05/04/may-day-uploads-tl-wr703n-tl-wr720n-tl-mr3020-images-secret-sauce/
Dear Madox,
I follow your excellent posts since many month now, as I try to connect my TL-WR703N routers using the USBIP software. I can now connect my router to a computer running Ubuntu 13.04 (32bits only, 64bits is not working).
I would like to connect many routers to a “small” dedicated computer (Seagate FreeAgent running Debian 6.0.7), but cannot yet achieve that goal : it looks like there’s an issue with the protocol version. Did you try to connect your WR703 router to a computer running Debian Linux, and if this worked, can you share what to do to get it working ?
I can share my debuging informations with you by email if needed !
Many thanks in advance,
Best regards,
Jean
The Windows 0.2.0.0 client requires a particular version so I patched the server on my image to match it. The Linux 1.1.1 clients have no issue connecting to it.
— usbip_old/userspace/configure.ac 2012-08-05 22:25:47.613523579 +1000
+++ usbip_new/userspace/configure.ac 2012-08-05 22:26:29.573523585 +1000
@@ -2,7 +2,7 @@
AC_PREREQ(2.59)
AC_INIT([usbip-utils], [1.1.1], [linux-usb@vger.kernel.org])
-AC_DEFINE([USBIP_VERSION], [0x00000111], [binary-coded decimal version number])
+AC_DEFINE([USBIP_VERSION], [0x00000106], [binary-coded decimal version number, hacked to make it work with sourceforge windows client])
CURRENT=0
REVISION=1
YES! It took me:
* bricking 2 wr703’s
* destroying 1 of those wr703ns
* buying some new soldering tools (see also the above)
* a couple days
* learning how to use minicom
* installing openwrt (super bricking it), wr740n firmware [somewhat accidentally], wr703n firmware (start over), the openwrt factory firmware, and finally successfully getting the usbip firmware
* then learning how to do networking in openwrt
* then learning how to install device drivers in windows 8 (did I mention installing vmware?)
* dealing with window’s embarrassingly bad command prompt (how is that thing still so bad)
* eating a large deep dish pizza by myself
And I now finally have a wireless Up printer.
Some day I will mentally regroup and write up all the steps I had to go through.
Thanks for putting this together. It’s very cool.
Hehe your funny story is appreciated 🙂 How did you manage the accidental WR740 firmware install? Was all that before you found this page? 🙂
Sorry for the delayed response. I had a lot of issues with installing openwrt. Specifically, on the first one the install failed then bricked it, and on the second one, I couldn’t get wifi to work.
On the first one, post bricking it, I burnt out the circuit board trying to get some wires attached so I could get a serial port working on it. On the second, I got the initial install working, but couldn’t ever get wifi working. So then I attempted to restore it back to factory (which lead to me running wr740n on it). Then I couldn’t get it to reinstall openwrt, nor the stock wr703 firmware.
In trying to do that, I eventually bricked that one too.
However, after watching some more circuit soldering/desoldering guides, buying some solder flux (game changer) and much practicing on my already fried one, I eventually got the wires soldered on. I then connected those wires to an arduino to act as a USB to Serial converter.
Once I finally got that working, I was able to install the firmware on it, and eventually got my wireless working!
I wish I’d of written up all the steps at the time. Definitely was one of my more epic hacks.
How reliable do you find your device to be with your setup? I frequently have issues transferring files over to be printed. In particular, today I had it fail 7ish times on a single transfer (470 layer print). While generally it works good enough for me to prefer it over having to get up and connect my computer to it, it isn’t super reliable.
I haven’t been able to track down if it’s the driver under windows flaking out, or on the router side of things.
I’ll also echo some of the other issues people had regarding getting the drivers setup, and in getting a reliable usbip build. It’s pretty interesting that it got pulled into the kernel with the state of it. Again, not complaining too much, but it seems like the usbip project kinda stalled out and isn’t in a great state right now.
Dear Richie,
I have the same issues regarding the bricked WR703N after trying to install a new version of the OpenWRT image on them : could you maybe take some of your time for writing a nice “howto unbrick for noobs” maybe ? This would not only save my time, but save money and won’t leave broken boxes on my desk …
Many thanks in advance 🙂
Jean
Hi, your post is so great. I have the same problem with brianFruit
When I run the usbip -a [wireless ip] 1-1, it just gives me an error message:
usbip err: usbip_windows.c: 825 (attach_device) tcp connect
My Firmware Images is the Standard one not the USBIP one, is this the reason for why the error comes out ??
Yes, the Standard image doesn’t include USBIP… and even if you install the USBIP image you have to follow the instructions above for it to work (obviously you haven’t run the commands on the router yet).
Thank you very much!!! I am now successfully connect to my usb thumb drive via the 703n. However, when I try to plug in my arduino UNO and a USB webcam, it said that my computer doesn’t have the driver and cannot recognize my device. Do you know how can I solve this problem?? Thank you.
Hi Jacky, have you ever used those on your PC before? I try to connect them directly to the PC, let Windows find all the drivers etc before reconnecting on the router for USBIP. I found that this way lets Windows get to the drivers more easily. Keep in mind that the Uno no longer uses an FTDI chip and you might need to install drivers for it.
When I plug in my Microsoft HD-5000 camera and the Arduino UNO directly to my PC, they both can be recognized by my PC and install the driver successfully. However, when I try to connect them one by one via the 703n. My HD-5000 camera is recognized as a “USB Device Over IP” in my Device Manager and it said the driver can not be successfully install.My PC knows it is a camera since “USB Device Over IP” is shown in the camera category in the Device Manager. For my Arduino UNO, my PC just recognizes it as a “Device can not be recognized” in my Device Manager. Please help me…What should I do to get them work??? Thank you.
I have tried that my i-phone 3gs can be recognized by my PC successfully via the 703n.
I can not connect my 703 through my wifi router.
703 connected to wifi router , but doesnt respond to ping requests or usbip requests.
I can ping other connected devices by the way.
what can solve this problem?
Most likely it is the firewall, did you follow the instructions to set the firewall zone for the WiFi to LAN?
Hey there! Great project!
I’ve been trying to set this up and have confirmed that the USB device is recognized by the router. However, I’m not sure the USB driver is working properly. Does the USB driver work with Windows 8? And how about Windows 7 or OSX?
Kindest Regards,
Taylor Amarel
I have disabled all firewalls but I keep getting the error,
usbip err: usbip_windows.c: 654 (import_device) open vbus driver
usbip err: usbip_windows.c: 840 (attach_device) query
Anyone have any suggestions on fixing this?
I can confirm that the USBIP client works in Vista X64, Windows 7 X32. I will test it on Windows 8 X64.
Regards
Johan
Problems solved.
The issue some people are having (like I was having) has to do with what operating system they are using on their PC. None of the comments from people (like me) who were having problems stated what OS they were using. I was having all the same errors noted above and was trying to use a machine running XP.
If you have an XP machine you will need to use version 0.1.0.0. This will work fine for flash drives as I tested tonight, but will not work for an Arduino 2560 R3 based 3d Printer. It will report several things about unknown devices, unknown protocols, and other stuff, and even if you manually install the correct drivers it just won’t work. If you want to use well known devices like flash drives, it will work fine. Use the exact same procedure above to install the drivers but do not use the V0.2.0.0 files. They will not connect to ANY USB device via the TP Link USB connector if the PC is running XP. The earlier USBIP files can be found here:
http://sourceforge.net/projects/usbip/files/usbip_windows/usbip_windows_v0.1.0.0_signed.zip/download . My advice is to skip the whole XP thing and use a windows 7 machine. You will save yourself the many hours I have spent trying to get this to work on the XP machine.
If you have a Windows 7 (x64) machine as well, just use it. It works great. Wish I went that way from the start. I went through the same procedure and Damn if everything I tried worked with no fuss including my Arduino 2560 R3 based 3D printer!
Thank you Madox so much for the time and effort! I can’t thank you enough.
Did I miss a “donate button” some where?
Is there something I can do for you?
EpicenterBryan
Hi! Thanks for the great tutorial!
I want to control my USB 5.1 audio card over ethernet. http://www.trust.com/products/product.aspx?artnr=14134
Followed all the steps and I can remotely access a usb stick. When I connet the sound card it does not connect/recognize the card or sometimes I get a blue screen.
I thought it might have to do with power consumption of the card, so I connected a powered usb hub. No device connected to the hub is recognized (not even the USB stick that works connecting directly to the 703n).
Any ideas?
Thanks!
Hi!
I t should work I think. But it is not.
Any suggestions what might have gone wrong?
I am trying to connect a USB Mouse, connected to 703n via a hub.
I get:
C:\usbip>usbip -a 10.100.6.165 1-1.2
usbip err: usbip_windows.c: 62 (usbip_vbus_dev_node_name) usbvbus interface is not registered
usbip err: usbip_windows.c: 654 (import_device) open vbus driver
usbip err: usbip_windows.c: 840 (attach_device) query
DETAILS:
1.OpenWRT:
root@OpenWrt:/# usbip bind -b 1-1.2
bind device on busid 1-1.2: complete
2. PC
C:\usbip>usbip -l 10.100.6.165
– 10.100.6.165
1-1.2: Logitech, Inc. : G3 (MX518) Optical Mouse (046d:c051)
: /sys/devices/platform/ehci-platform/usb1/1-1/1-1.2
: (Defined at Interface level) (00/00/00)
: 0 – Human Interface Device / Boot Interface Subclass / Mouse (03/01/02)
3.OpenWRT:
usbipd: info: connection from 10.105.2.67:33040
usbipd: info: received request: 0x8005(6)
usbipd: info: exportable devices: 1
libusbip: debug: usbip_common.c:85:[dump_usb_device] path = /sys/devices/platform/ehci-platform/usb1/1-1/1-1.2
libusbip: debug: usbip_common.c:86:[dump_usb_device] busid = 1-1.2
libusbip: debug: usbip_common.c:92:[dump_usb_device] Device(C/SC/P) = (Defined at Interface level) (00/00/00)
libusbip: debug: usbip_common.c:94:[dump_usb_device] bcdDevice = 3000
libusbip: debug: usbip_common.c:99:[dump_usb_device] Vendor/Product = unknown vendor : unknown product (046d:c051)
libusbip: debug: usbip_common.c:101:[dump_usb_device] bNumConfigurations = 1
libusbip: debug: usbip_common.c:102:[dump_usb_device] bNumInterfaces = 1
libusbip: debug: usbip_common.c:105:[dump_usb_device] speed = Low Speed(1.5Mbps)
libusbip: debug: usbip_common.c:107:[dump_usb_device] busnum = 1
libusbip: debug: usbip_common.c:108:[dump_usb_device] devnum = 35
libusbip: debug: usbip_common.c:77:[dump_usb_interface] Interface(C/SC/P) = unknown class / unknown subclass / unknown protocol (03/01/02)
usbipd: info: request 0x8005(6): complete
4.PC
C:\usbip>usbip -a 10.100.6.165 1-1.2
usbip err: usbip_windows.c: 62 (usbip_vbus_dev_node_name) usbvbus interface is not registered
usbip err: usbip_windows.c: 654 (import_device) open vbus driver
usbip err: usbip_windows.c: 840 (attach_device) query
5.OpenWRT:
root@OpenWrt:/# usbipd: info: connection from 10.105.2.67:33091
usbipd: info: received request: 0x8005(6)
usbipd: info: exportable devices: 1
libusbip: debug: usbip_common.c:85:[dump_usb_device] path = /sys/devices/platform/ehci-platform/usb1/1-1/1-1.2
libusbip: debug: usbip_common.c:86:[dump_usb_device] busid = 1-1.2
libusbip: debug: usbip_common.c:92:[dump_usb_device] Device(C/SC/P) = (Defined at Interface level) (00/00/00)
libusbip: debug: usbip_common.c:94:[dump_usb_device] bcdDevice = 3000
libusbip: debug: usbip_common.c:99:[dump_usb_device] Vendor/Product = unknown vendor : unknown product (046d:c051)
libusbip: debug: usbip_common.c:101:[dump_usb_device] bNumConfigurations = 1
libusbip: debug: usbip_common.c:102:[dump_usb_device] bNumInterfaces = 1
libusbip: debug: usbip_common.c:105:[dump_usb_device] speed = Low Speed(1.5Mbps)
libusbip: debug: usbip_common.c:107:[dump_usb_device] busnum = 1
libusbip: debug: usbip_common.c:108:[dump_usb_device] devnum = 35
libusbip: debug: usbip_common.c:77:[dump_usb_interface] Interface(C/SC/P) = unknown class / unknown subclass / unknown protocol (03/01/02)
usbipd: info: request 0x8005(6): complete
usbipd: info: connection from 10.105.2.67:33092
usbipd: info: received request: 0x8003(6)
usbipd: info: found requested device: 1-1.2
libusbip: debug: usbip_host_driver.c:370:[usbip_host_export_device] write: 6
libusbip: debug: usbip_host_driver.c:379:[usbip_host_export_device] connect: 1-1.2
usbipd: debug: usbipd.c:137:[recv_request_import] import request busid 1-1.2: complete
usbipd: info: request 0x8003(6): complete
Thanks for any input!
I had forgotten to add USB/IP Enumerator in windows 7 Hardware Wizard
It is closer to working now 🙂
But now Windows starts looking for a driver via Windows Update, wich fails. And command line as follows:
C:\usbip>usbip -a 10.100.6.165 1-1.2
new usb device attached to usbvbus port 1
usbip err: usbip_windows.c: 374 (write_to_dev) read from sock ret 0 not equal a usbip_header
Hi again!
Sorry for the spam 🙂
I finaly gotten it to work.
Unfortunatly I got a bluescreen on the windows7 machine after a while.
Will experiment some more.
Thanks!
The quick hotplug2 script below will start/stop usbipd on the wrt when the printer is plugged in/out
#!/bin/sh
# This is a pretty nasty/simple hotplug2 script to start/stop
# usbipd when the Up! printer is plugged in-out of the wrt.
# It should work by dropping it in to /etc/hotplug.d/usb/99-usbip
#
# Horrible Caveats:-
# 1. It works for me 😉
# 2. usbipd doesn’t make a .pid file so I used pkill instead
# 3. The $PRODUCT aproach is based on dumping hotplug2 enviroment
if [ “$ACTION” = “add” -a “$PRODUCT” = ‘4745/1/100’ ]; then
/usr/sbin/usbipd -D
fi
if [ “$ACTION” = “remove” -a “$PRODUCT” = ‘4745/1/100’ ]; then
pkill /usr/sbin/usbipd
fi
Hi ,
Great post!
Can you talkme how I can configurate it in wired network?
I just proved it in wireless network on windows 8.1 and works fine with usbip_windows_v0.2.0.0_signed , but I need to do it in wired network. I just have several TP-Link TL-WR703N to be upset to this wotk and I am new on this stuff and need your orientation.
Thanks alot for your help
If you have it working in wireless, it should work in wired too – you just have to set your Ethernet to be a DHCP client or have it as a fixed address (without DHCP server) to join your home network.
Thanks for your quickly answer. but how can I do it in Lucy interface?
I mean, I browse to http://192.168.1.1/ and where I tap to do this?
My lan network is 192.168.0.xx and the gateway is 192.16.0.1. I just change WR 703N ip :192.168.1.1 to 192.168.0.170?
Helpme please.
Hi,
I had your BASE image installed on my WR703N for a while and now decided to put USBIP version on it.
The problem is that USBIP version doesn’t leave enough room to install wpa_supplicant(~200k) which is required for my internet connection to work(dorm room).
Would you please specify which packages do I need to install to BASE image to have USBIP working with minimal size requirements, is there even enough room left in the WR703N. I installed some packages that I found but it still doesn’t work.
I found:
kmod-usbip
kmod-usbip-server
usbip
usbip-server <= I can't install this one since it requires 820kb
it doesn't find any clients not kmod-usbip-cliend nor usbip-client
regards
p.s.
Internet doesn't work with wpa_supplicant_mini
This tutorial works with the TL-WR702N?
Can I use this USBIP?
Hi Madox,
Congratulations, very interesting project! But do you think that might work with a USB Canon scanner?
Hi,
using your USBIP-Image, I do not get the usb-device working with my windows PC.
For testing, I sticked in a USB-Stick to the WL703N.
I see, that the stick is connected to the router:
C:\Temp\usbip>usbip -l 192.168.1.39
– 192.168.1.39
1-1: Kingston Technology Company Inc. : DataTraveler 2.0 4GB Flash Drive (1
3fe:1f00)
: /sys/devices/platform/ehci-platform/usb1/1-1
: (Defined at Interface level) (00/00/00)
: 0 – Mass Storage / SCSI / Bulk (Zip) (08/06/50)
But trying to attach, ther are three error messages:
C:\Temp\usbip>usbip -a 192.168.1.39 1-1
usbip err: usbip_windows.c: 62 (usbip_vbus_dev_node_name) usbvbus interface is
not registered
usbip err: usbip_windows.c: 654 (import_device) open vbus driver
usbip err: usbip_windows.c: 840 (attach_device) query
I disabled firewall and virus-scanner on my pc!
Does anybody have an idea?
Hi
I’m an italian student and I read your guide to set my TL-WR703n to client mode; but when I try to connect without ethernet cable, the router is unaccessible
Can you help me?
I flash the router with your USBIP firmware and at the beginning with your STANDARD firmware but i had the same result. I need this to my universitary project
Is there any way you would consider creating a build for one of these new A5-V11 bic-lighter size routers that support OpenWRT (see http://ofmodemsandmen.com/downloadsp.html for a working ROOter build for this device). These only cost around $8 US including shipping (http://www.ebay.com/itm/151790641507?_trksid=p2055119.m1438.l2649&ssPageName=STRK%3AMEBIDX%3AIT ) which is 1/3 what the 703n costs. Send me a private message and I’ll have one mailed to you for testing if you’d like to try to create a USP over IP for sharing. Thanks!