Engineering Design using Children’s Toys

Physical reverse engineering often involves 3D scanners and other similar technologies to capture the shape and form of the original object and may require equipment not available to the typical student or young engineer. In this short post, I’ll briefly outline the workflow of designing an ergonomic trackball prototype using approximately $4 worth of toys and no special equipment.

Background

A significant portion of my working time is spent in front of a computer, operating a computer. So it makes sense that the input devices I use should minimise strain on my body and the risks of RSI, and one of the ‘non-standard’ pieces of equipment I favour is a trackball rather than a ‘traditional’ mouse.  You can Google up the benefits of a trackball (or a vertical mouse) over a typical mouse, but there is another problem many of us will face – commercial products are typically designed around the ‘average person’, and more often than not, you are not all that average.

Ergonomics for me, myself, and I

Well I fall in the ‘more often than not bucket’ and definitely am not your average human.  I have relatively small hands and ‘ergonomic’ trackballs/mice available on the market simply do not quite fit my hands perfectly, and hence my desire to begin a quest to build my own.

Getting the shape of my hand…

Enter the toy!  Playfoam!

Playfoam! With sparkles to make it more fabulous!

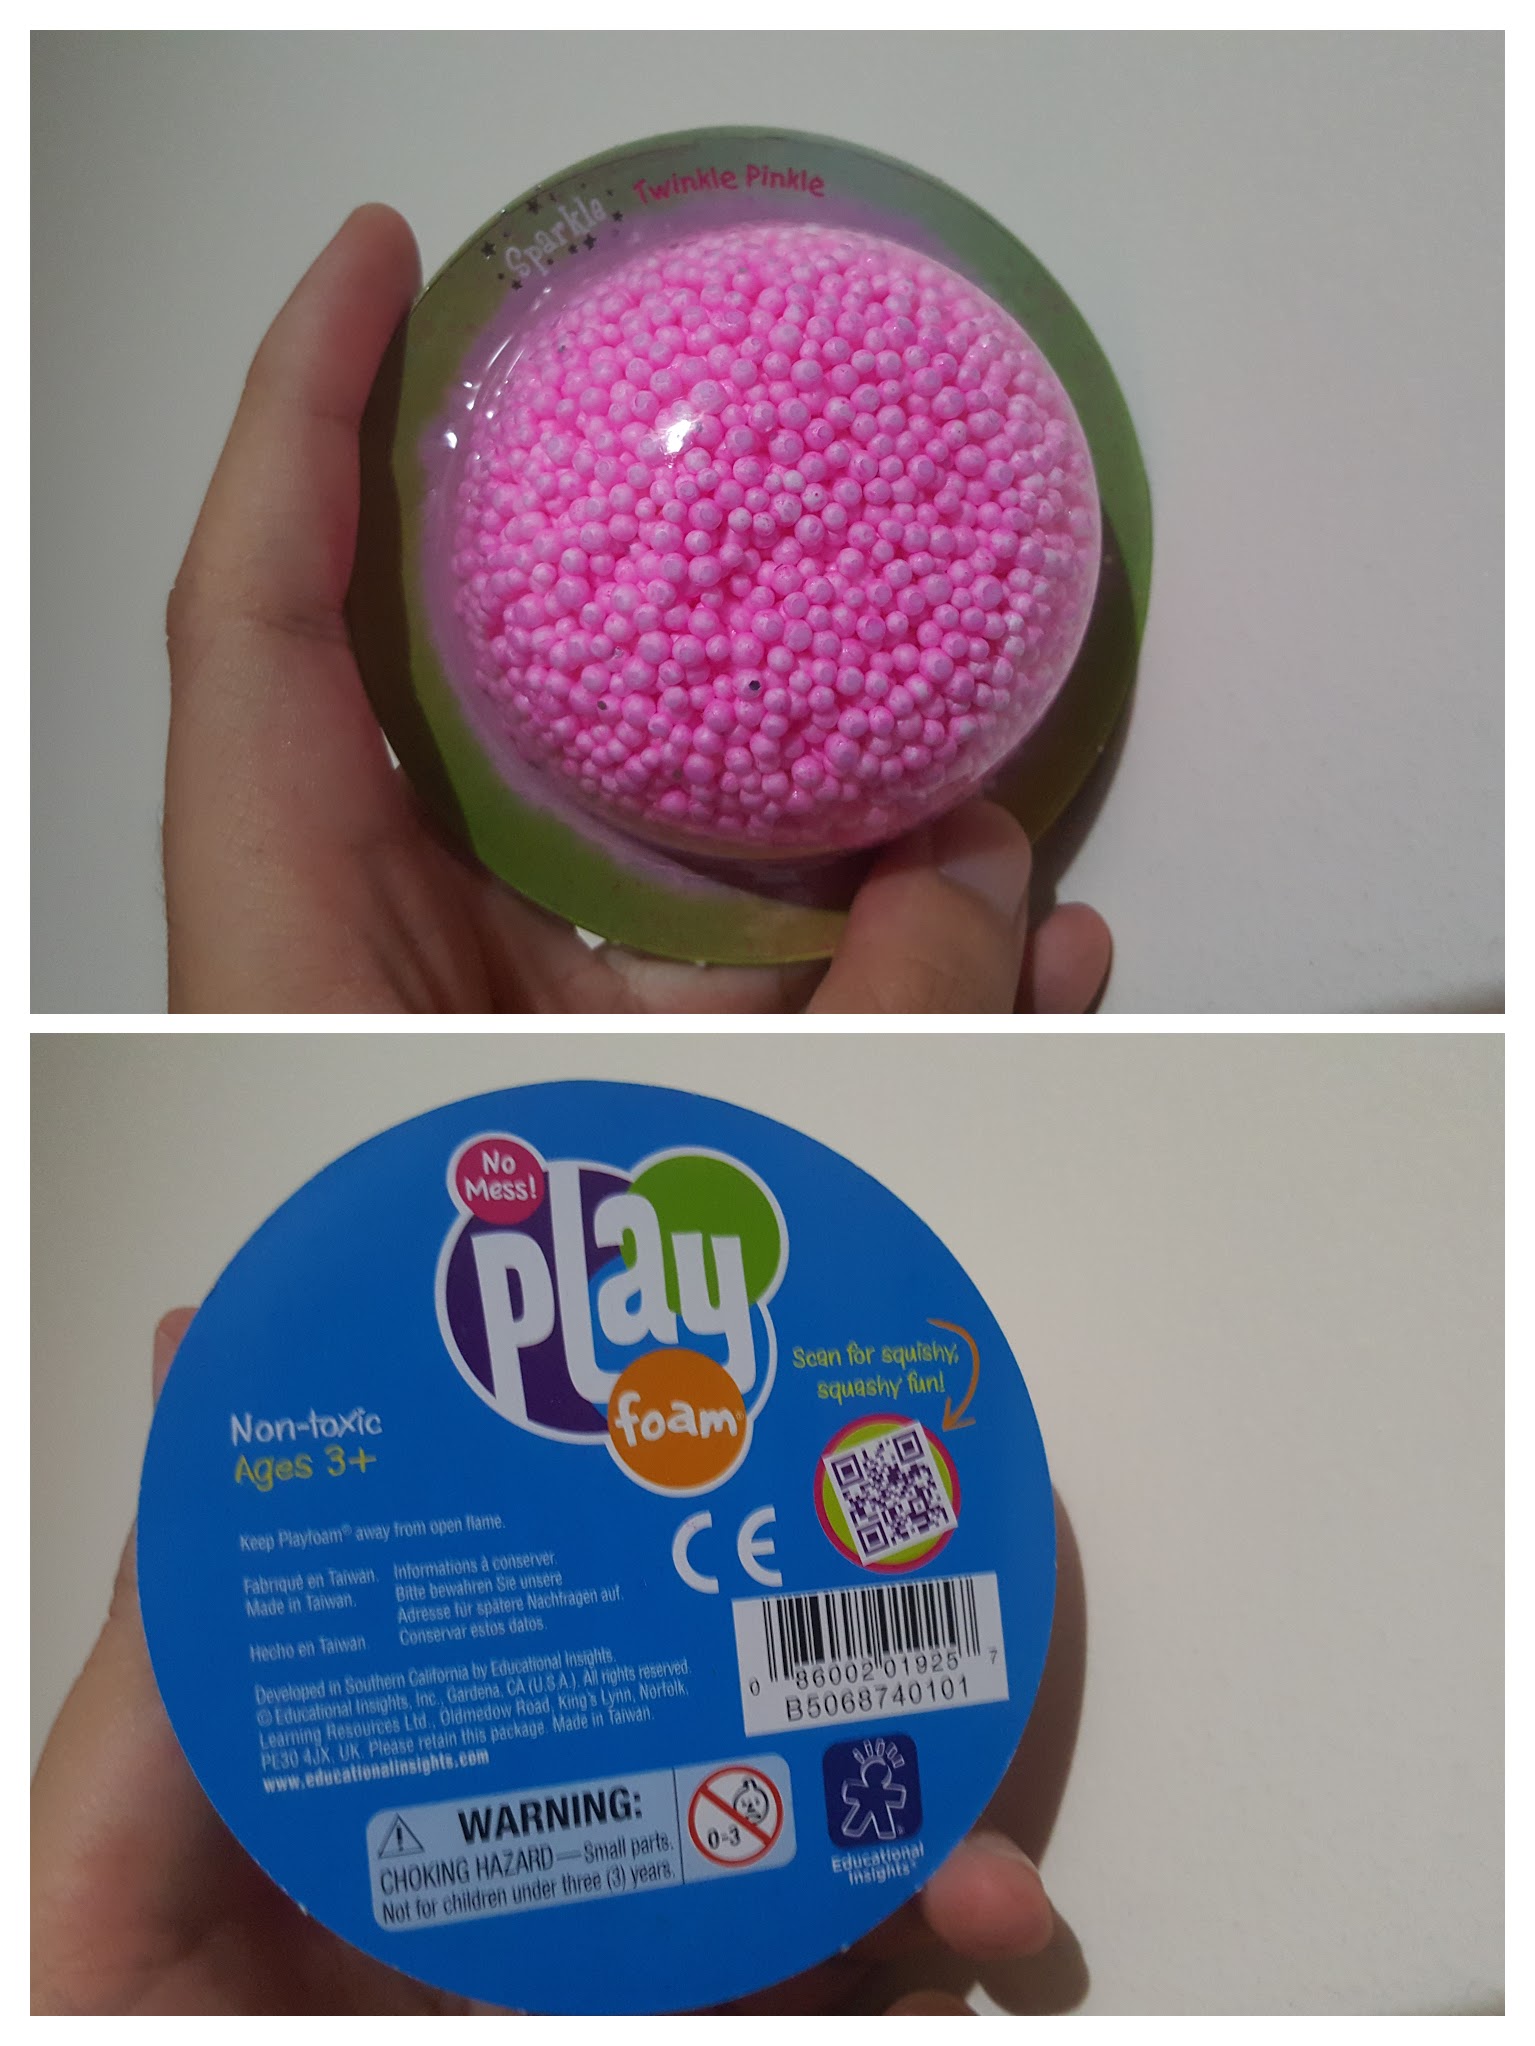
The concept of Playfoam is similar to that of play dough where the material is pliable and can be kneaded or formed into shapes for the young inquisitive mind.  However, Playfoam has significant advantages over play dough for this application in that Playfoam is :

  1. Doesn’t leave a mess everywhere.  Even though the pellets are sticky to themselves, there is no residue left over on your hands or anything else you use to shape it.
  2. Is much softer and pliable!  This is the primary benefit in that it doesn’t require the same amount of force you need to form play dough, but rather it just forms into shape.
  3. Has a natural resultant ‘texture’ that makes getting it into computer format much easier… see later….
  4. Reusable and won’t dry out.

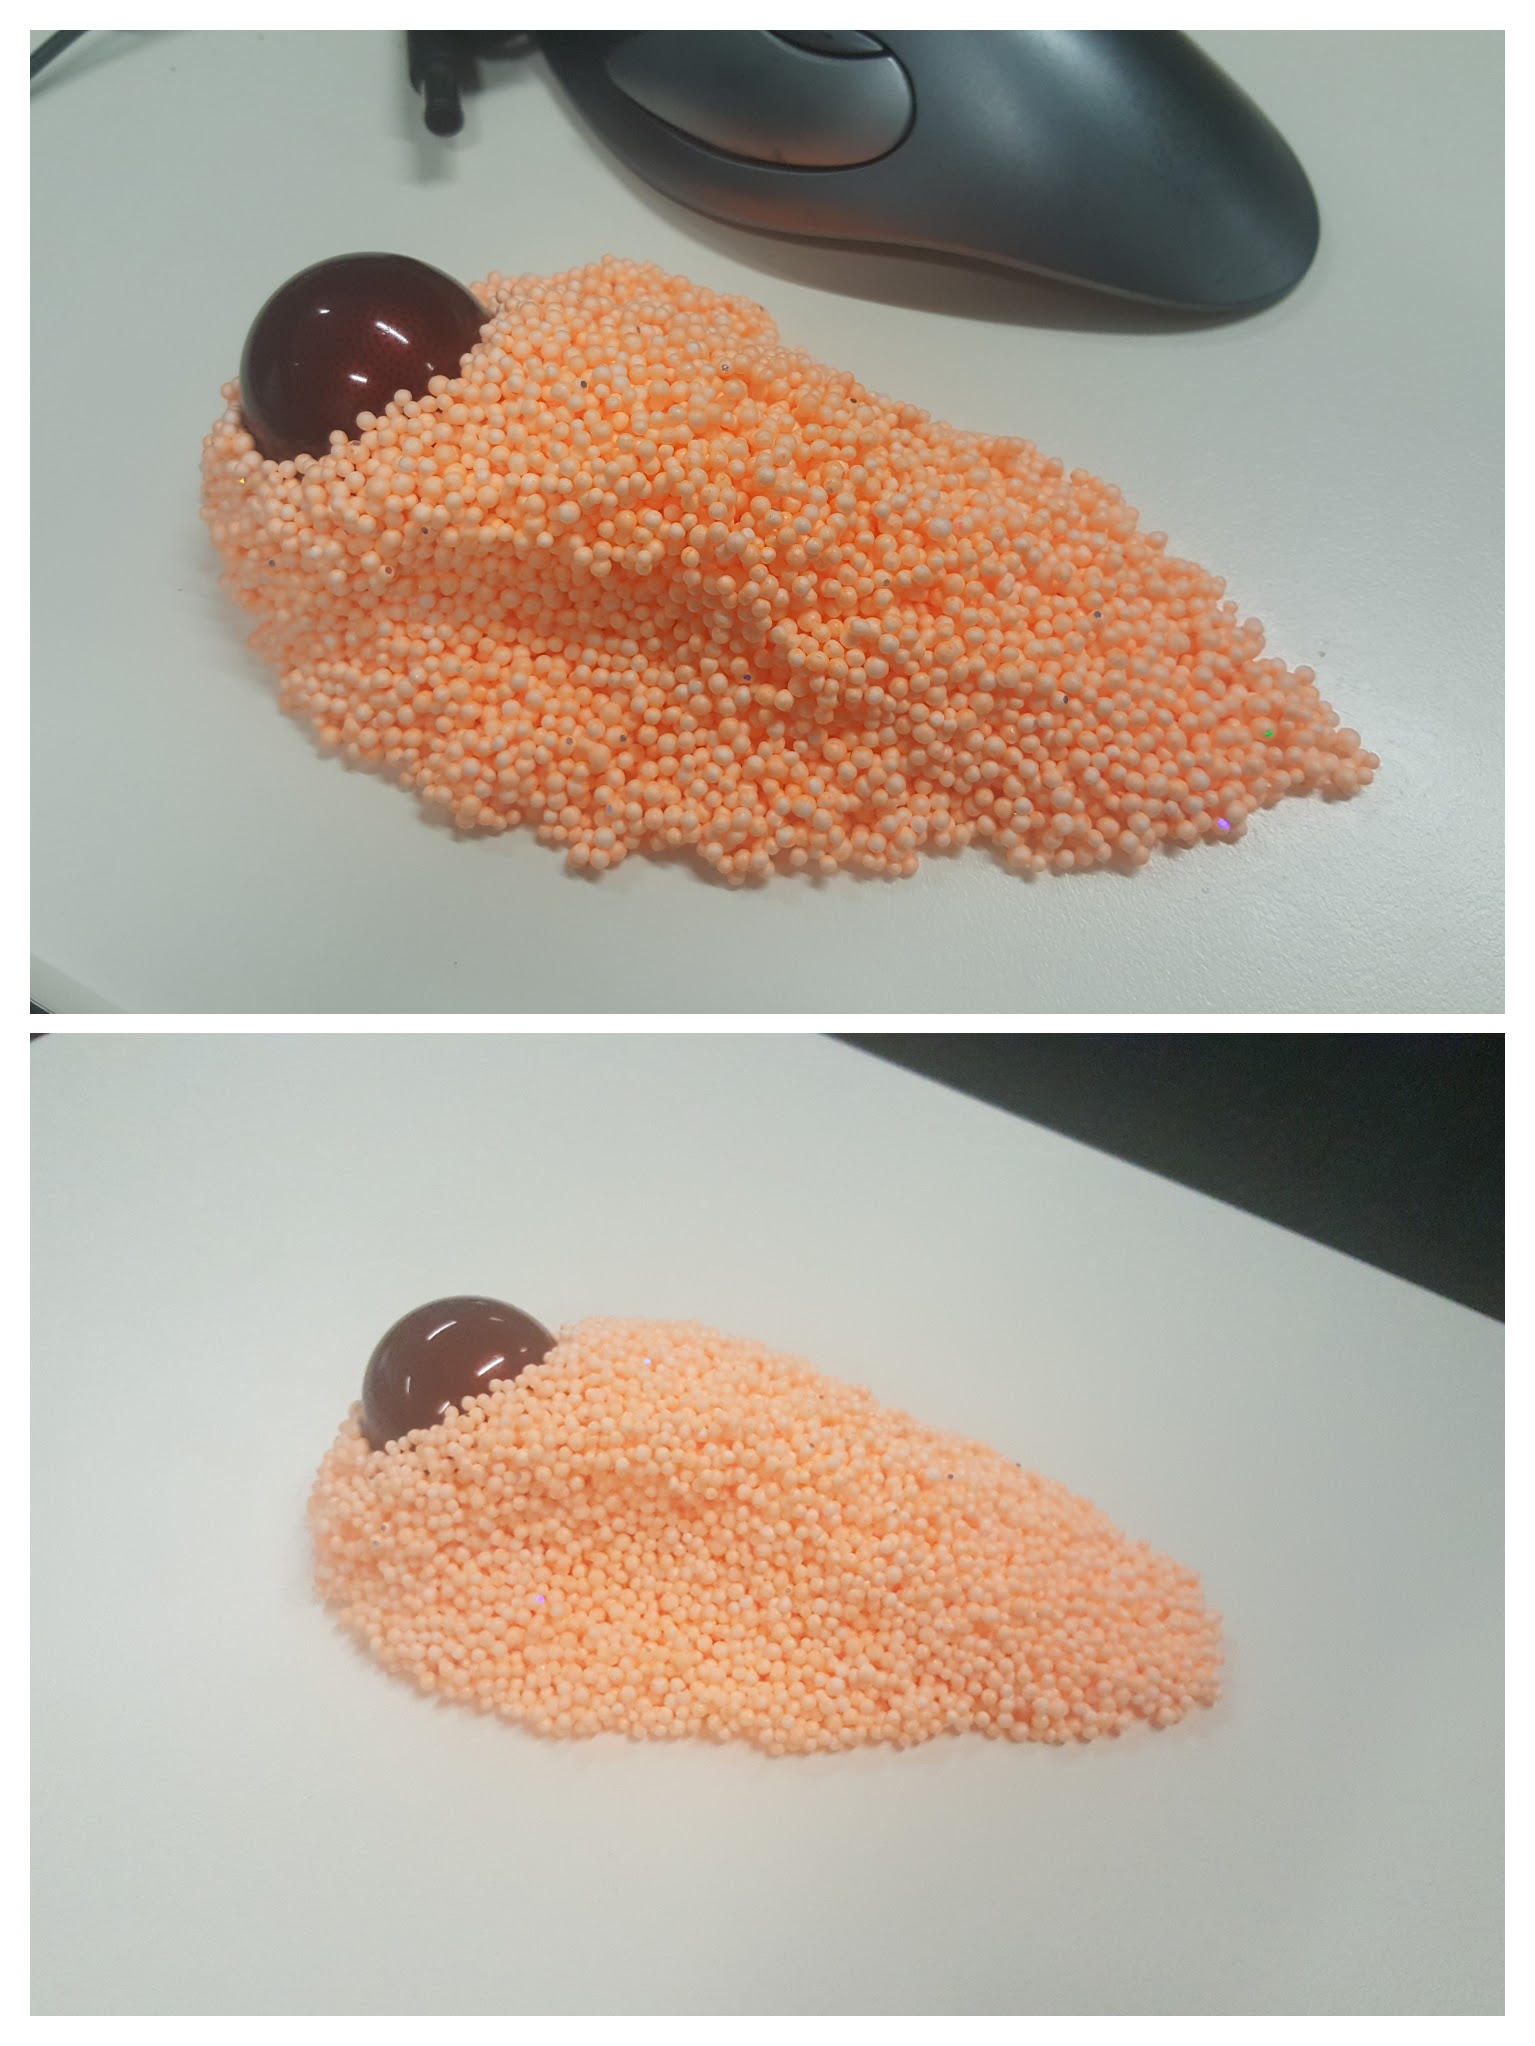
Getting the shape I wanted was simply a matter of grabbing a bunch of the stuff (2 blister packs worth) and making it feel right in my hand as if I was holding and using my ideal trackball.  I borrowed a ball from a ‘Logitech Trackman Marble’ to use as a guide on where the ball would be if it was an actual trackball.  Sometimes, I had to rearrange some excess material from places of the model to back fill some visible gaps or to stuff into crevices where my hand needed additional support.

Trackball in Playfoam, can you see the glitter sparkling?

Getting the shape into a computer…

‘Scanning’ the shape into the compute is a rather straight forward exercise.  I used photogrammetry as I first experimented with many years ago with Autodesk Catch but software moves on and as Photofly morphed into Catch, Catch has been morphed into Autodesk ReMake.  The process however is still the same, you take a series of photos angled around the model and load into the program to calculate a 3D model.  I didn’t bother with a dedicated camera at all, and simply used the ‘Pro’ mode on my Android phone and used a fixed manual focus for all photos per my experience from ~6 years ago.

Input photos, note the variety of angles in the photos.

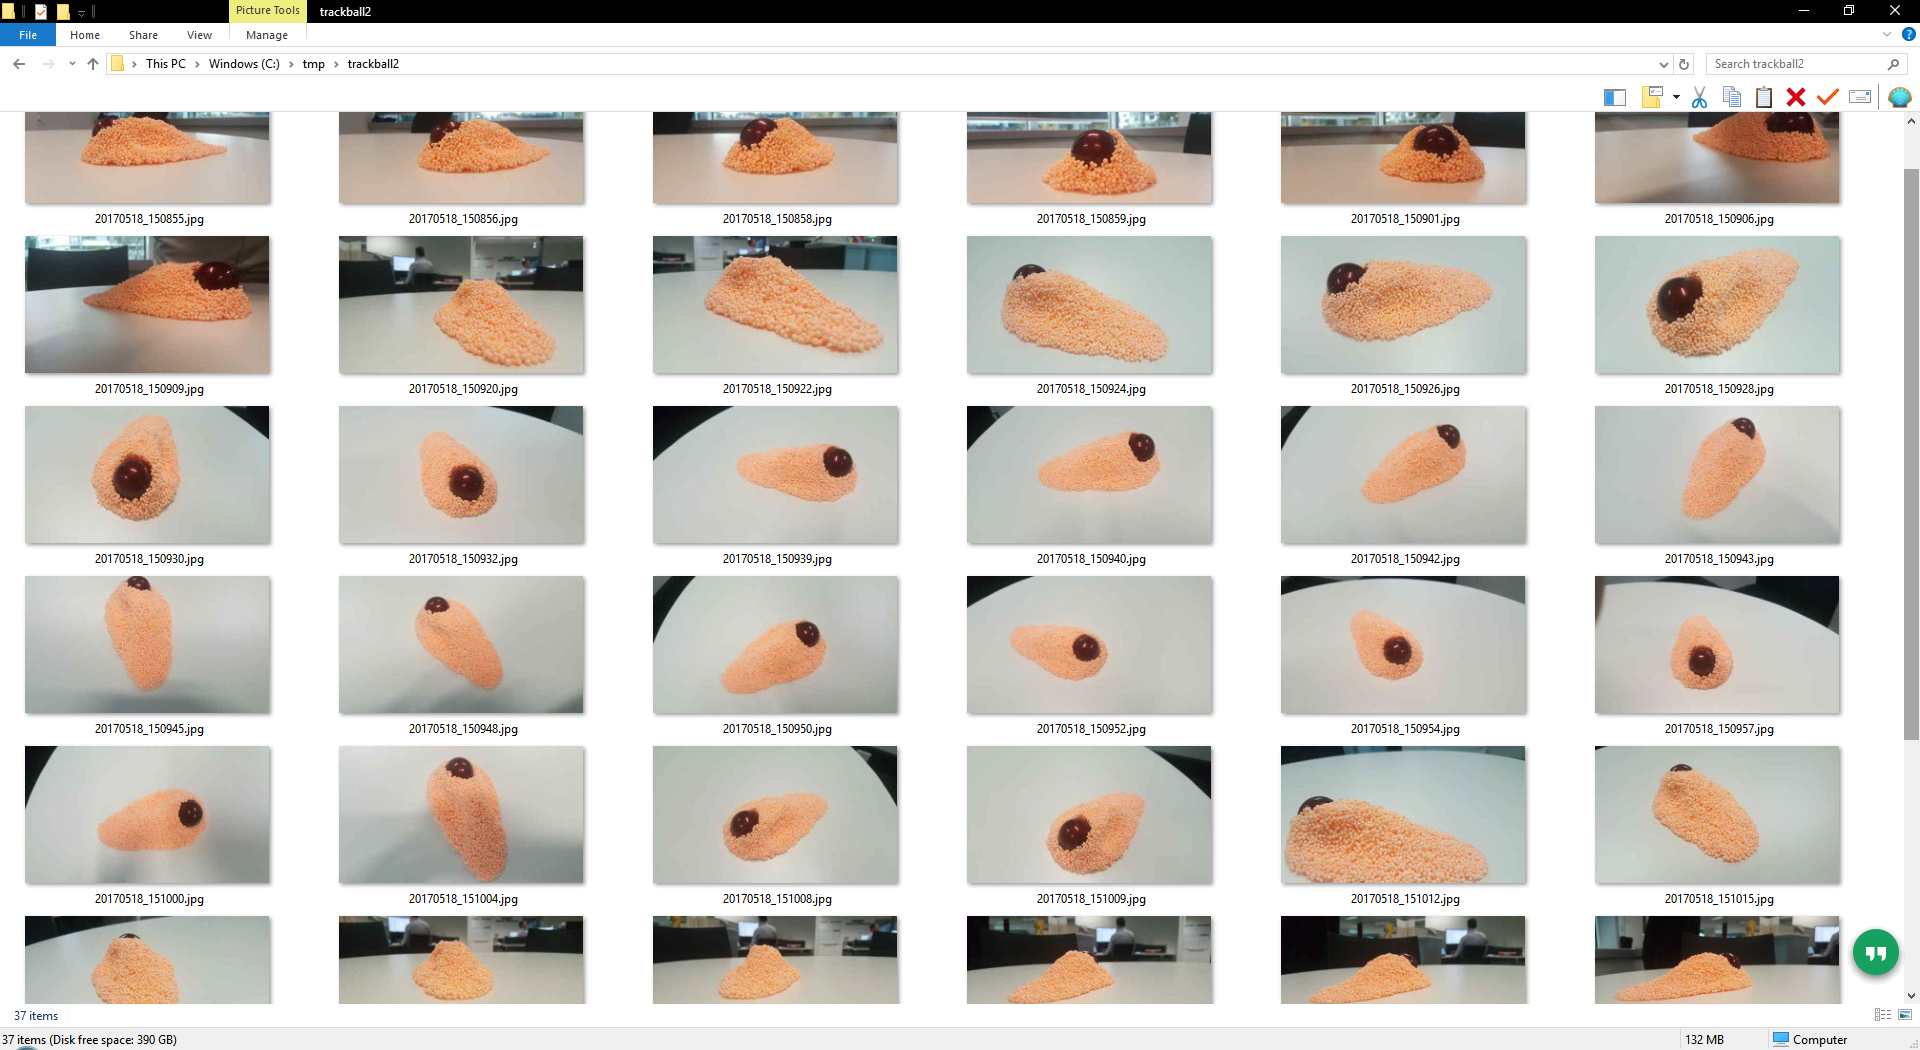
In total, I took 37 photos as pictured above.  Another tip is to remember to take photos from a variety of angles, enough to capture the shape of the object and definitely photos from low angles.  Photogrammetry struggles with smooth shiny surfaces as it is difficult to match two points in separate photos together if there are no unique features, this is where the texture of the Playfoam balls help get an easy result.

Resultant ReMake Model

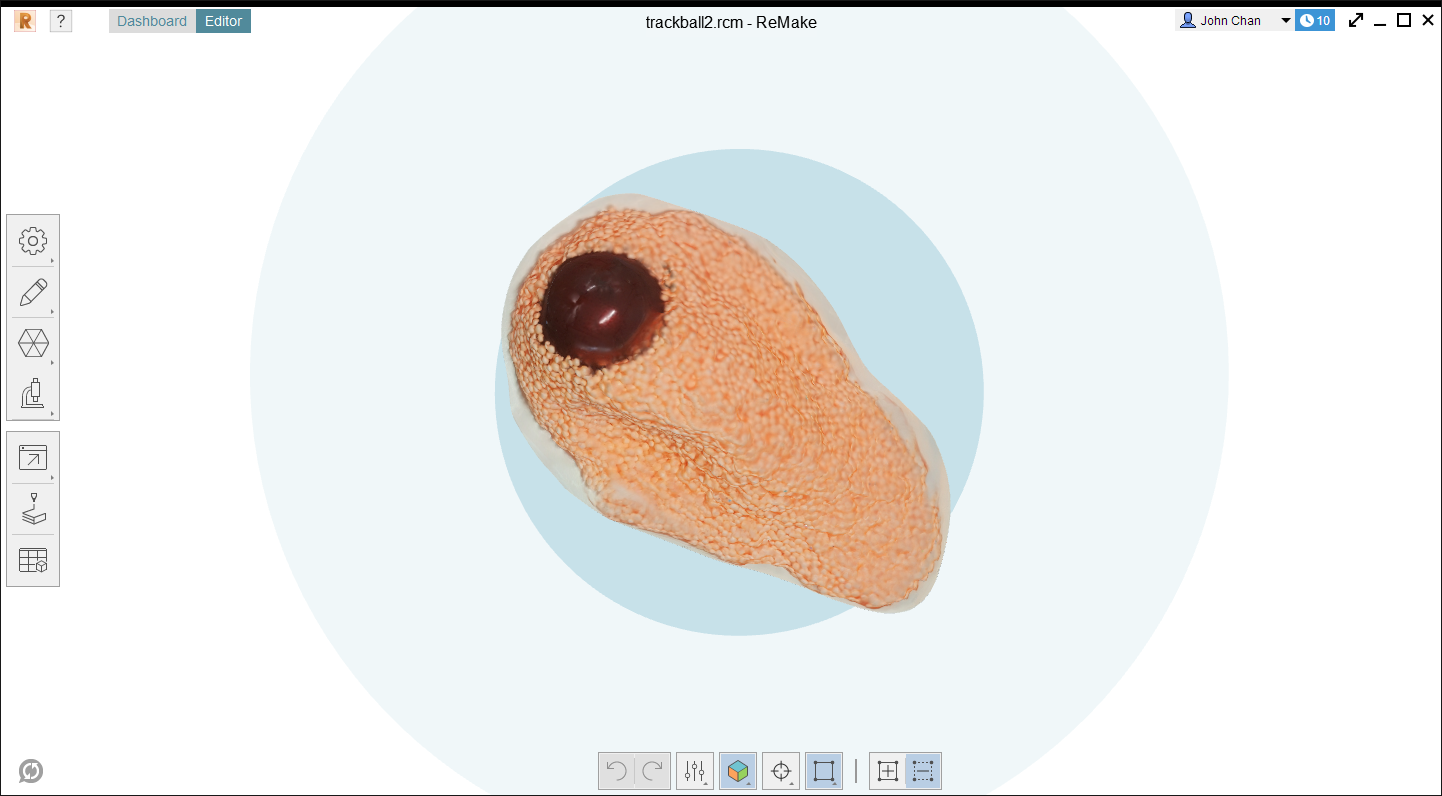
ReMake only works locally if you have a Nvidia graphics card, but there’s always the ‘cloud’ option which is what I used.  The model came back in 15-30 minutes after uploading and was good in all areas except the smooth ball which turned out like an alien blob.  The model was still bumpy and weird, but good enough!

One thing I forgot to do but should be a lesson learnt, is to put a small ruler or something of known dimensions in the view to be able to scale your model.  I made do with the ball which I knew to be 40mm, but it would have been nice to scale off something flat (ReMake lets you measure off two points anywhere within the model).

Getting the weird shape into something usable…

ReMake has the lovely and awesome feature of being able to export into a variety of formats, and conveniently within the Autodesk family of free for hobbyist tools is Fusion 360 (I swear this isn’t an Autodesk ad…).

Fusion 360 mesh import

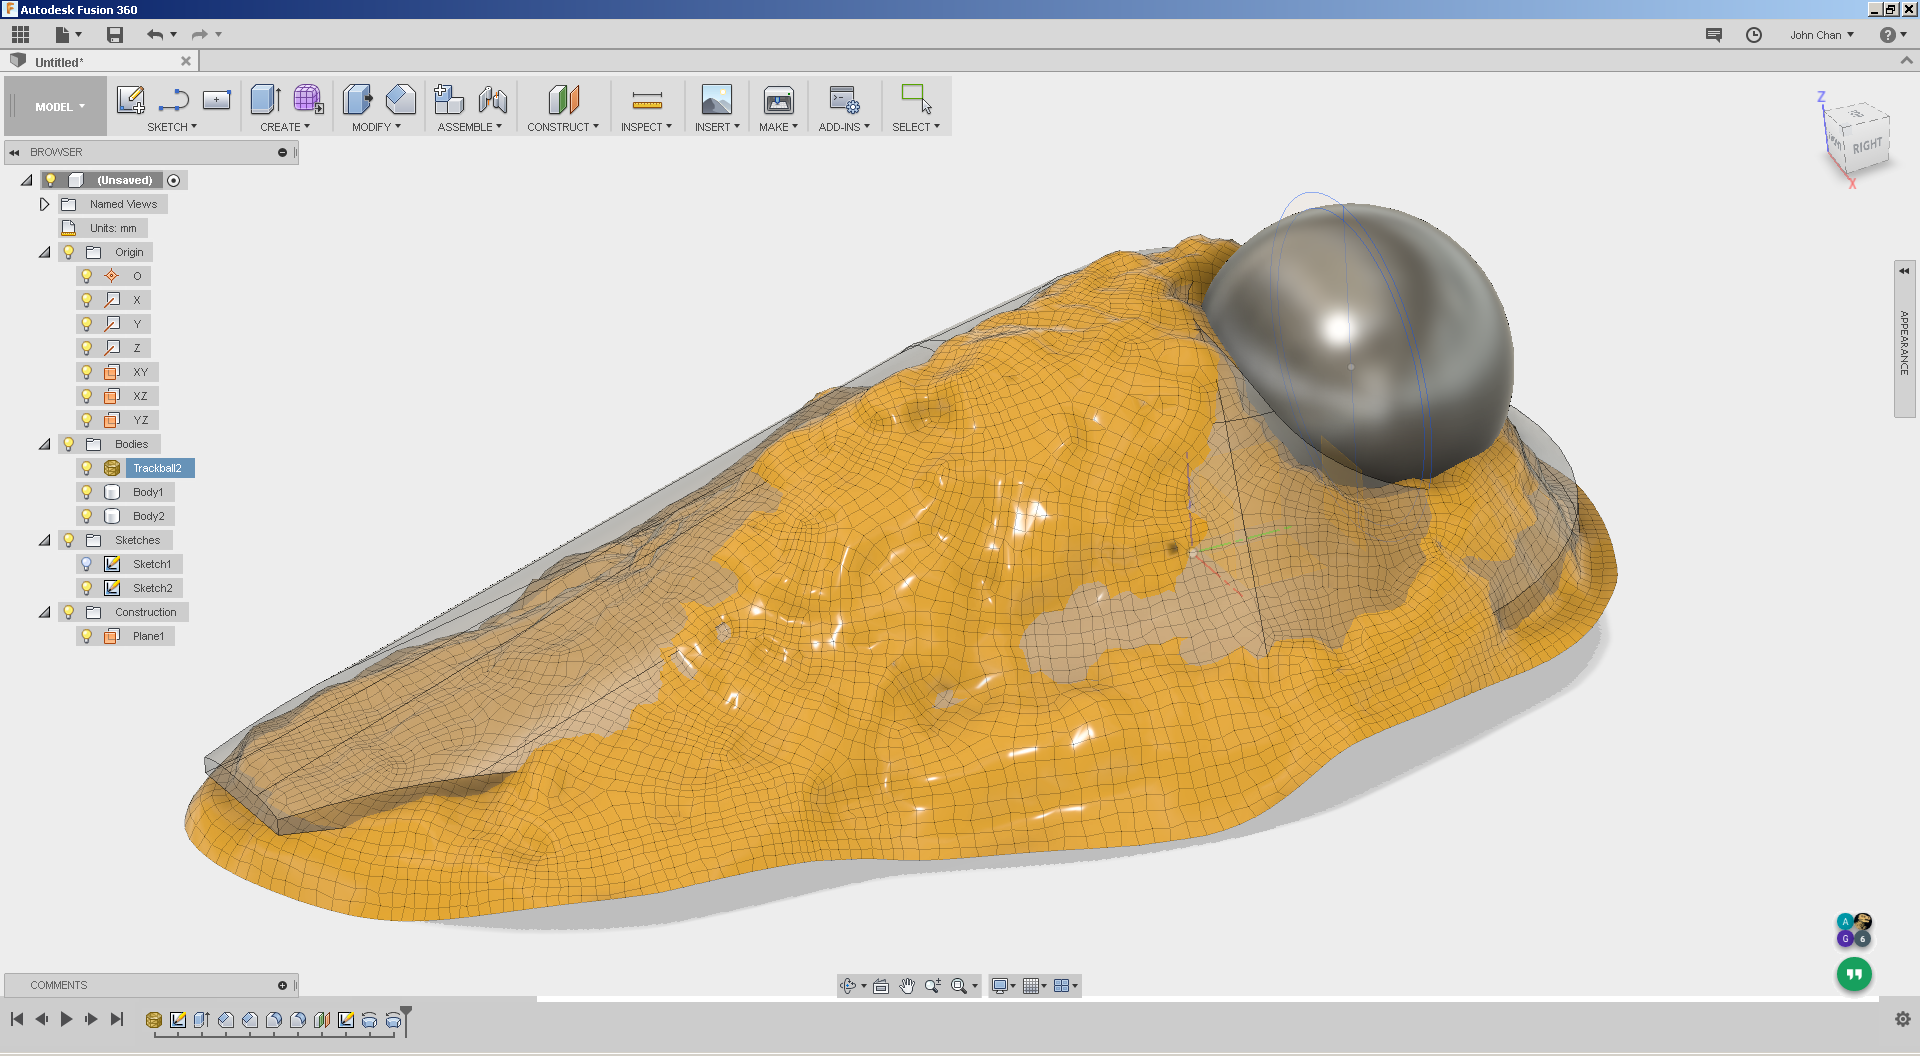
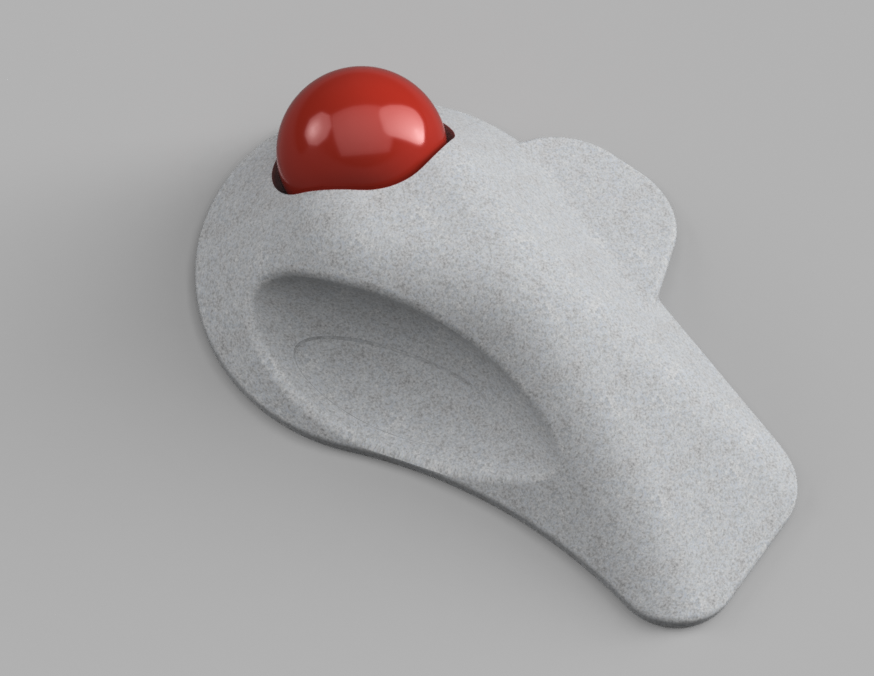
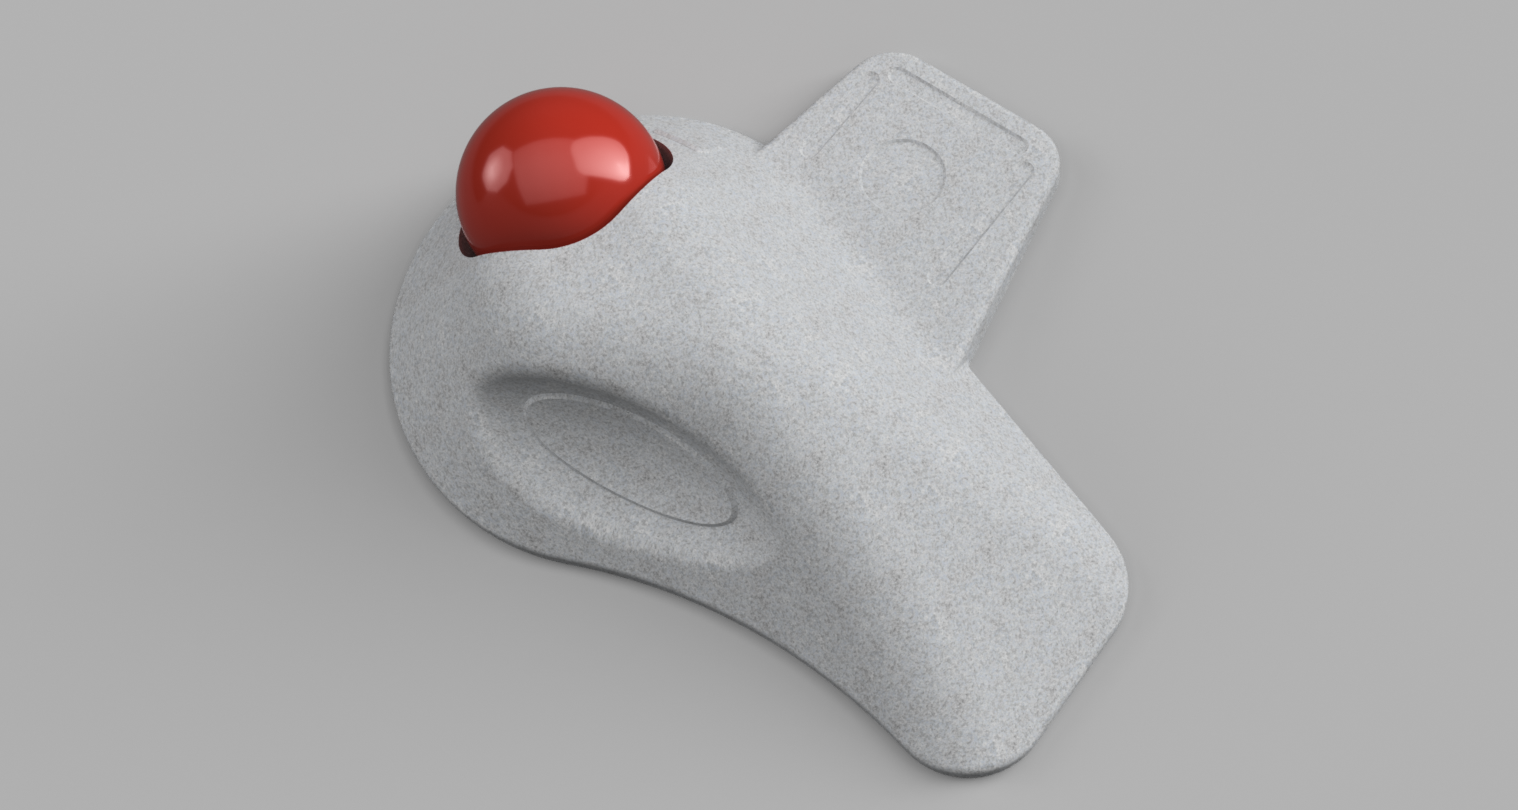
Importing into Fusion 360 is as trivial as ‘Insert Mesh’ and I had a rough 3D model within 15 minutes that ‘almost’ matched the shape of the imported mesh.  The trick here in this process is to either make the solid being worked with translucent (50% opacity for example) or the imported mesh to be translucent.  This lets you see how close you are with your featured 3D model with your target shape.  The picture above shows the imported mesh after being imported in ‘low quality’ and a grey solid modelled using simple features.  I dislike sculpting even for this application, and you can see in the feature tree above I had only used so far one extrude, one revolve, and two each of fillets and chamfers for this model (the other revolve is the ball, which technically isn’t part of the what I need).

A couple of extra views, mesh hidden and added ‘pinky pad’

Validating the shape…

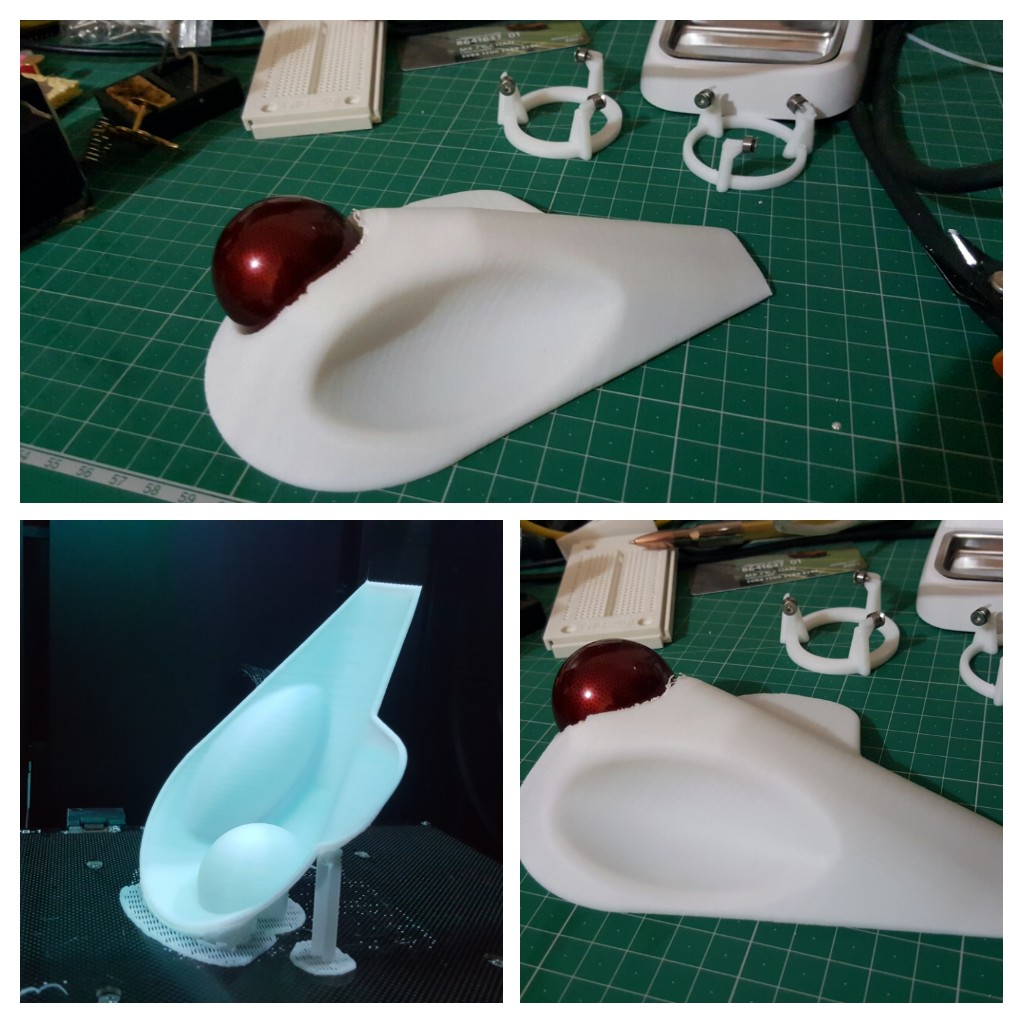
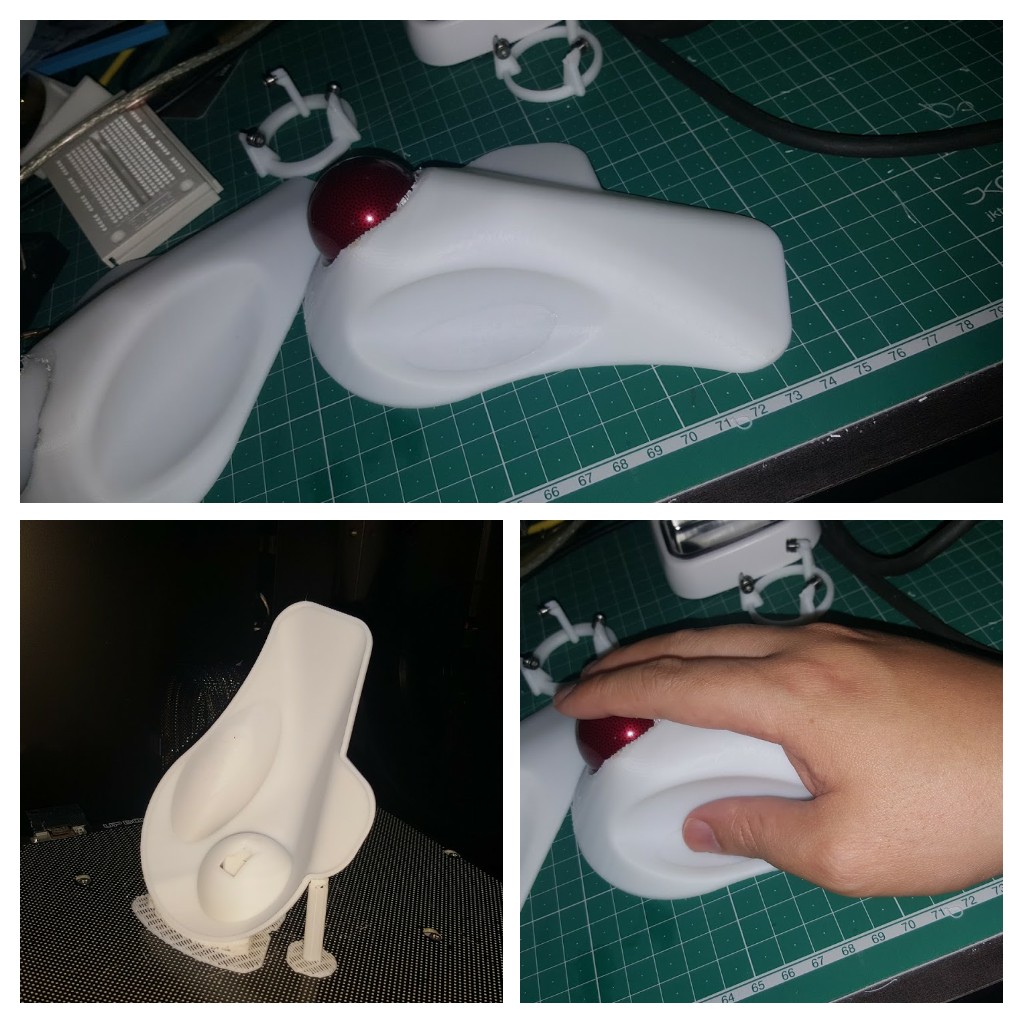
This is where I go ‘oopsies’ and realised that part of my workflow does include the use of special equipment, an Up! Box 3D printer… again not an ad, but tell the guy Madox sent ya 😉

I suppose I could argue the prototype design was complete prior to this step, but having something you can put in your hand to validate is very very nice.  Having the physical print (with yet a different donor trackball) to try with my hand made me go ‘meh…this isn’t right…’, that huge mismatch with the mesh should have told me something!

Wait… I used special equipment 😛

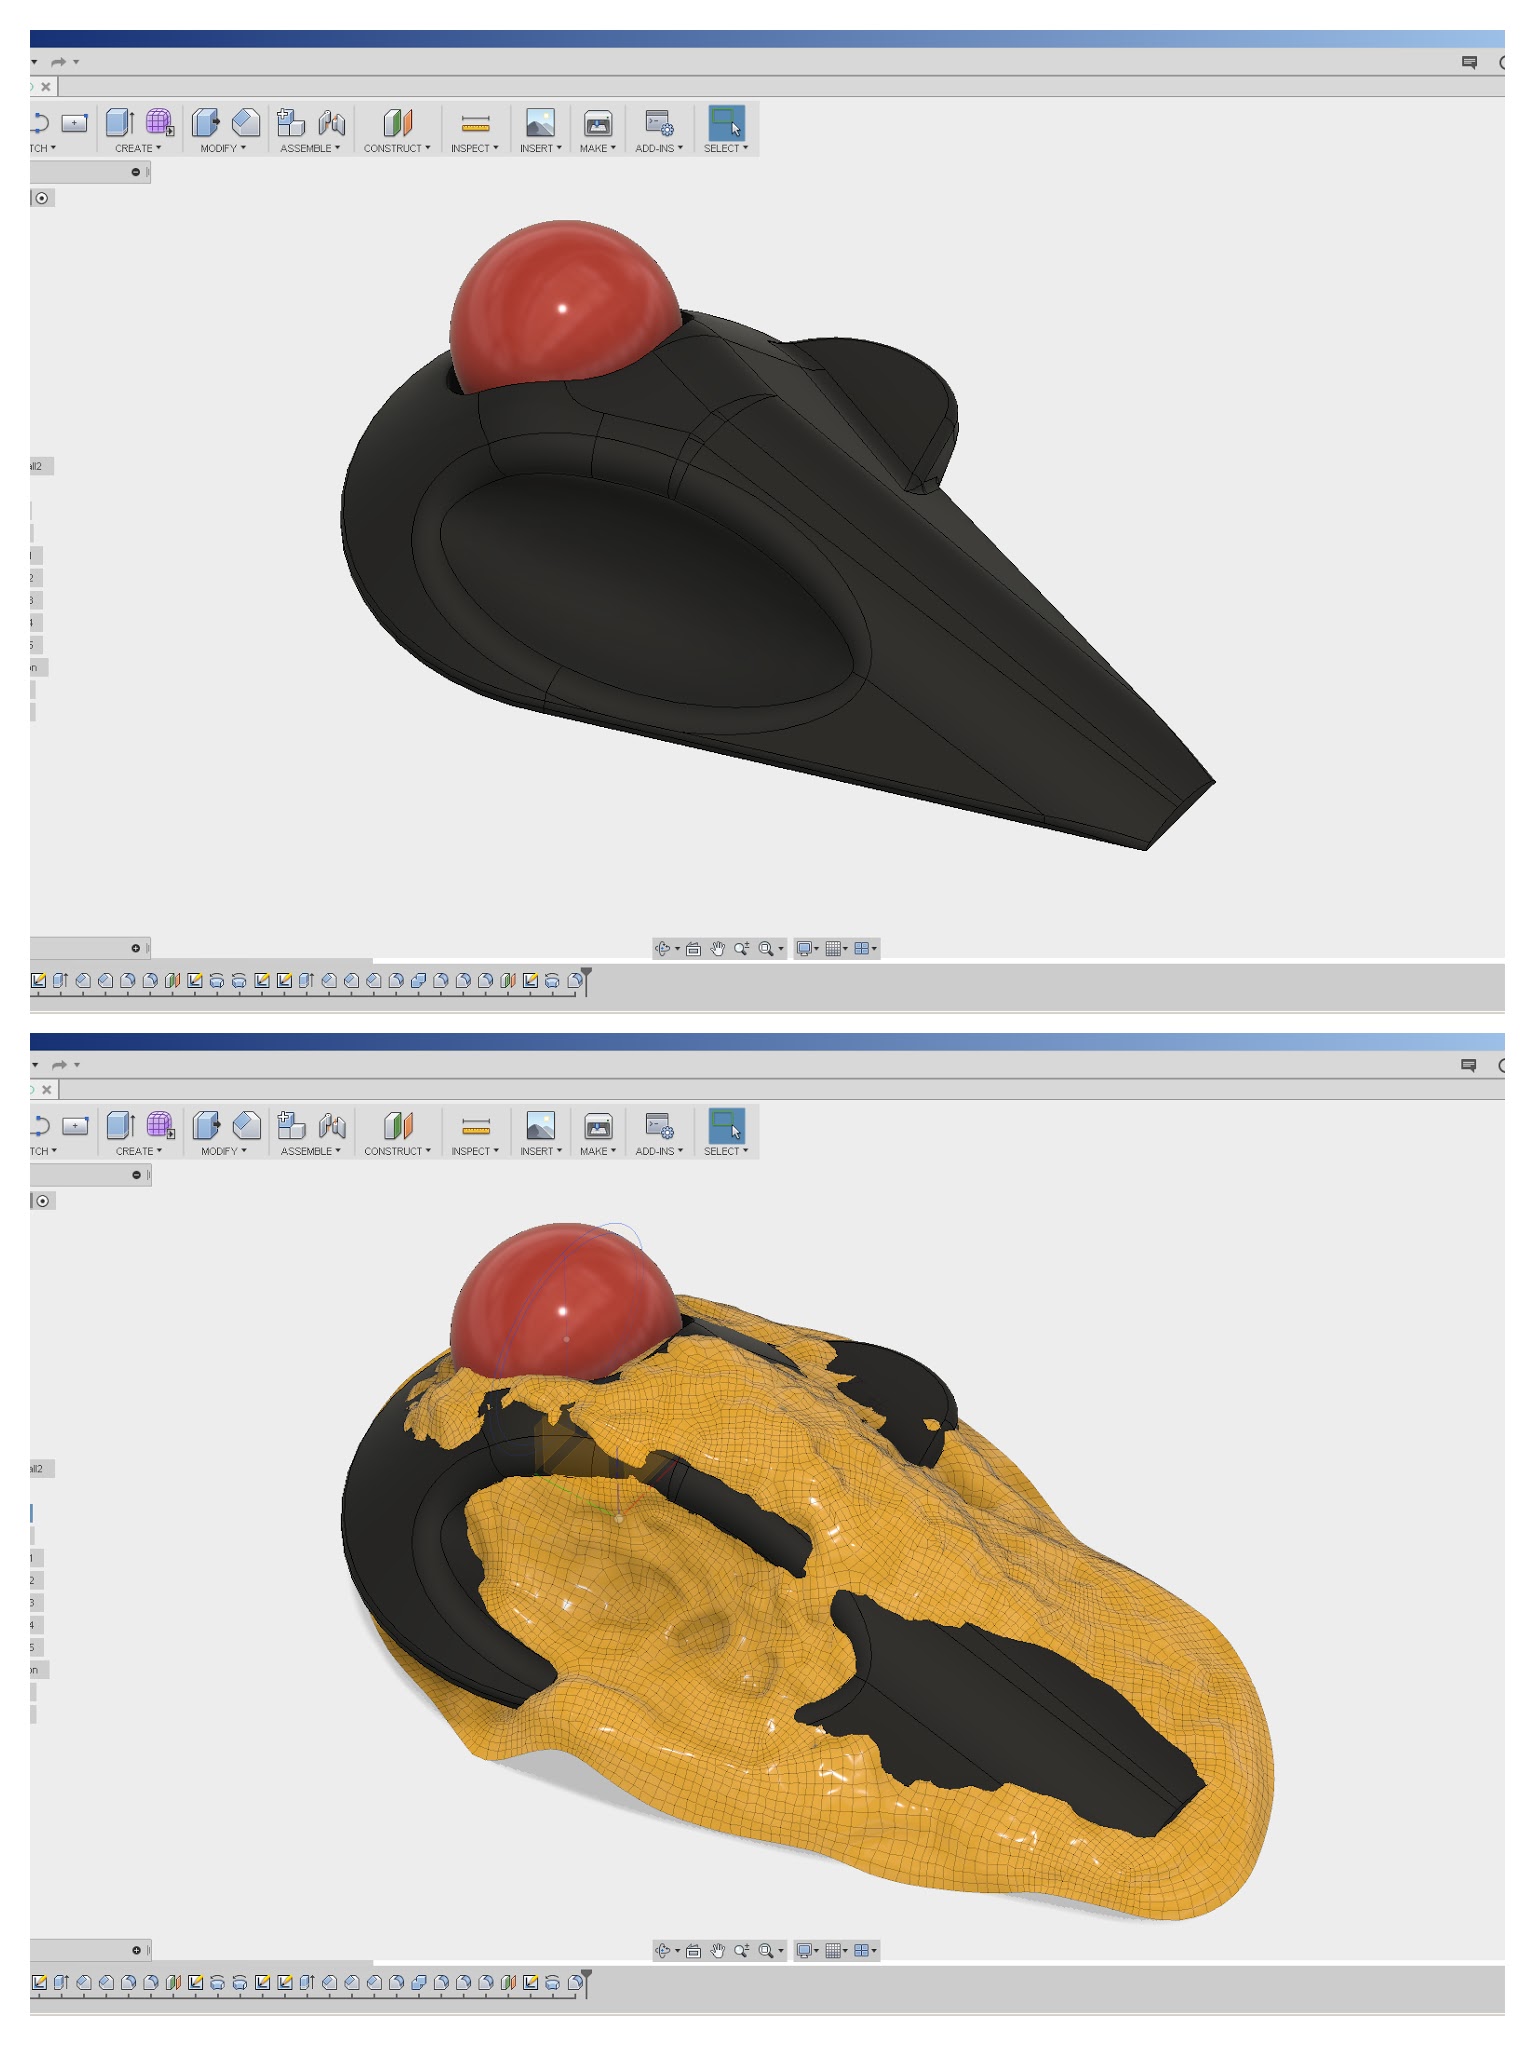
I quickly remodelled the casing and printed it again…yet I still didn’t see the obvious ‘ITS NOT MATCHING THE MESH MATE!’ glaring at me in the screenshot below.

Mistake #2…
Render of mistake #2, looks disturbingly like an existing commercial product….
Print and hand trial of mistake #2, nope, the thumb position really felt off.

Third time lucky… and on-screen validation

While printing doesn’t cost much, printing two ‘not quite right’ casings was annoying me.  Yes that is the point of having a 3D printer, to make mistakes more quickly, but it doesn’t mean I have to like making them.

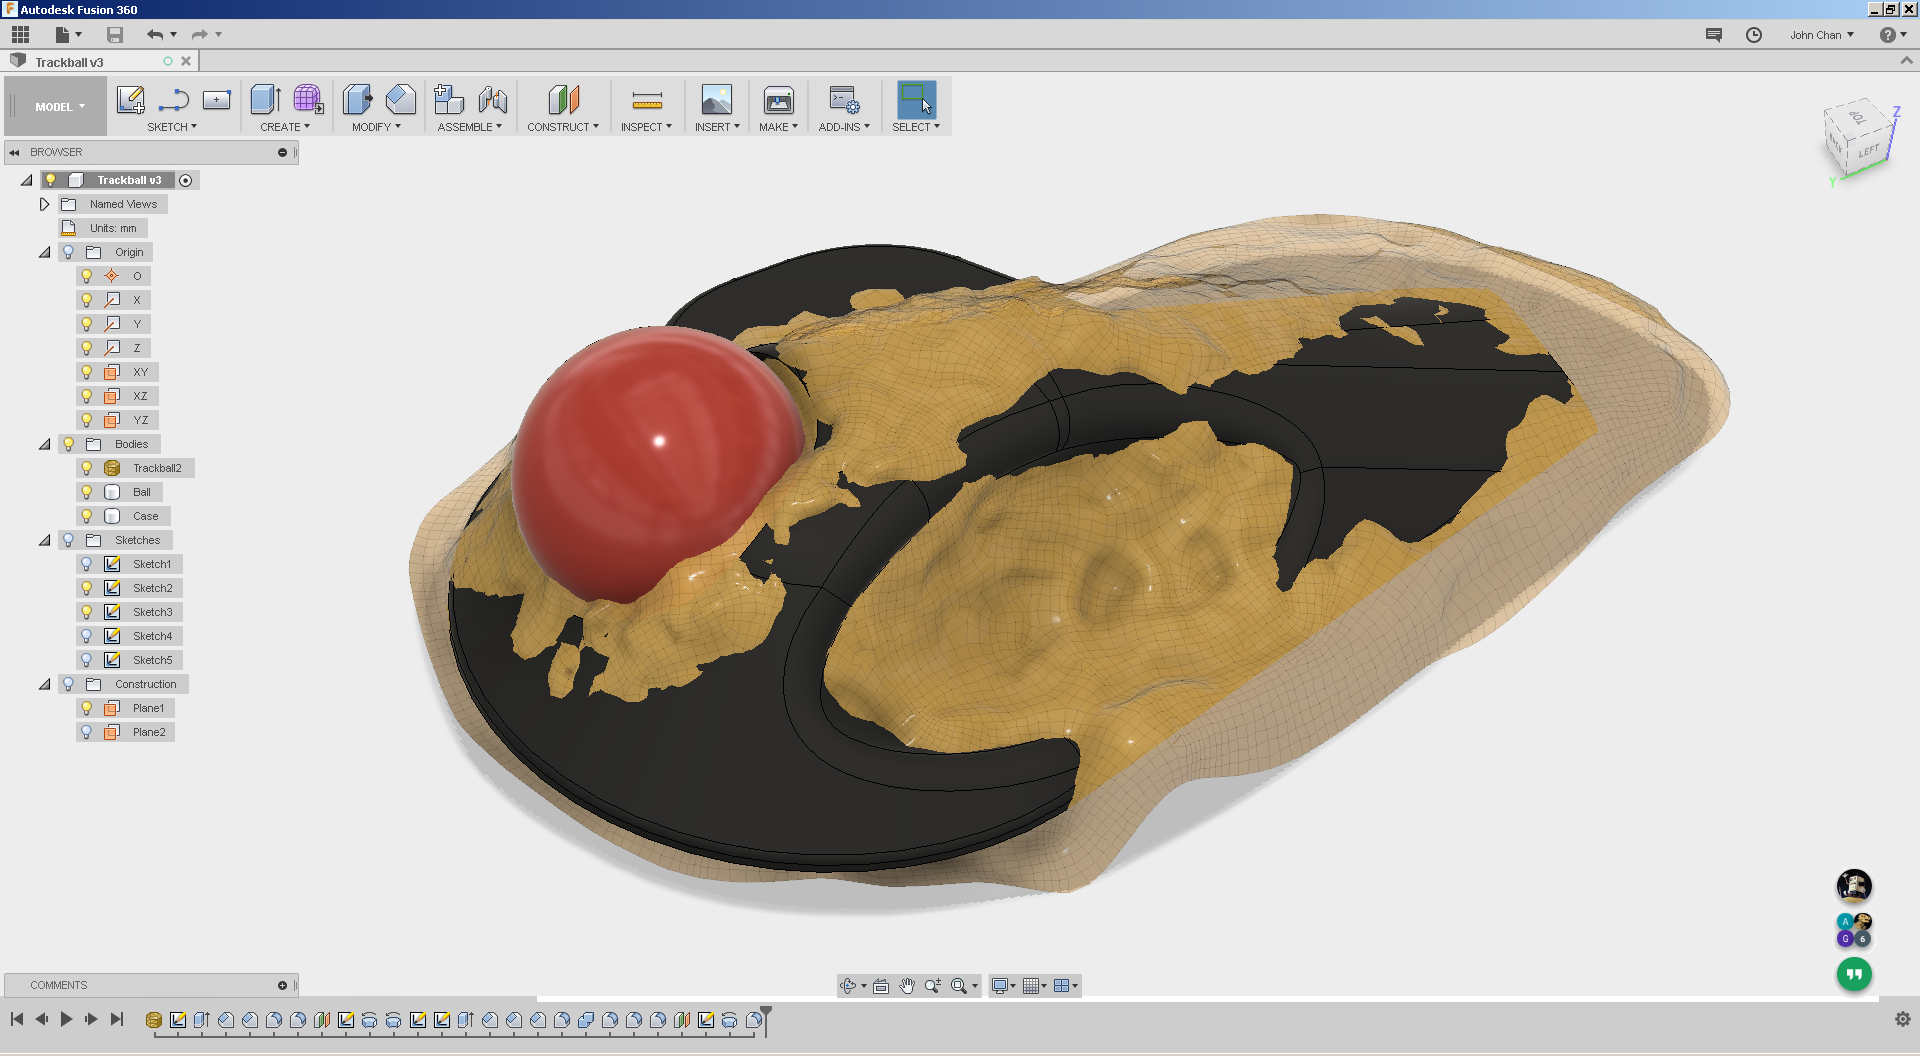
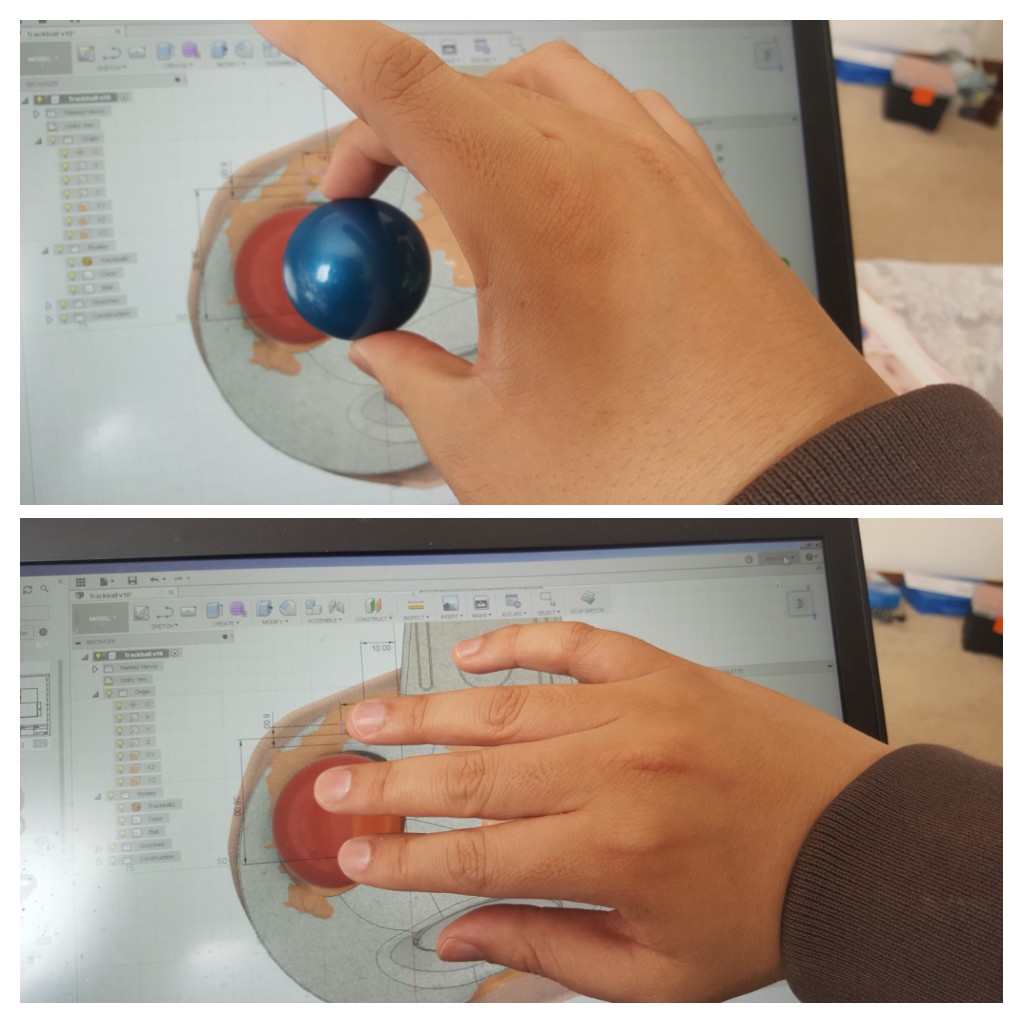
Then it occurred to me that I could check rough positioning of button placements etc on the screen!  A donor 40 mm Kensington trackball was borrowed to calibrate the on-screen display of the CAD model, and I simply placed my hand on the screen to get a rough appreciation that I’ve finally got the buttons in the right place.

Checking it before printing! On the screen!
Final fitting…Its alive!!! … or at least it fits.

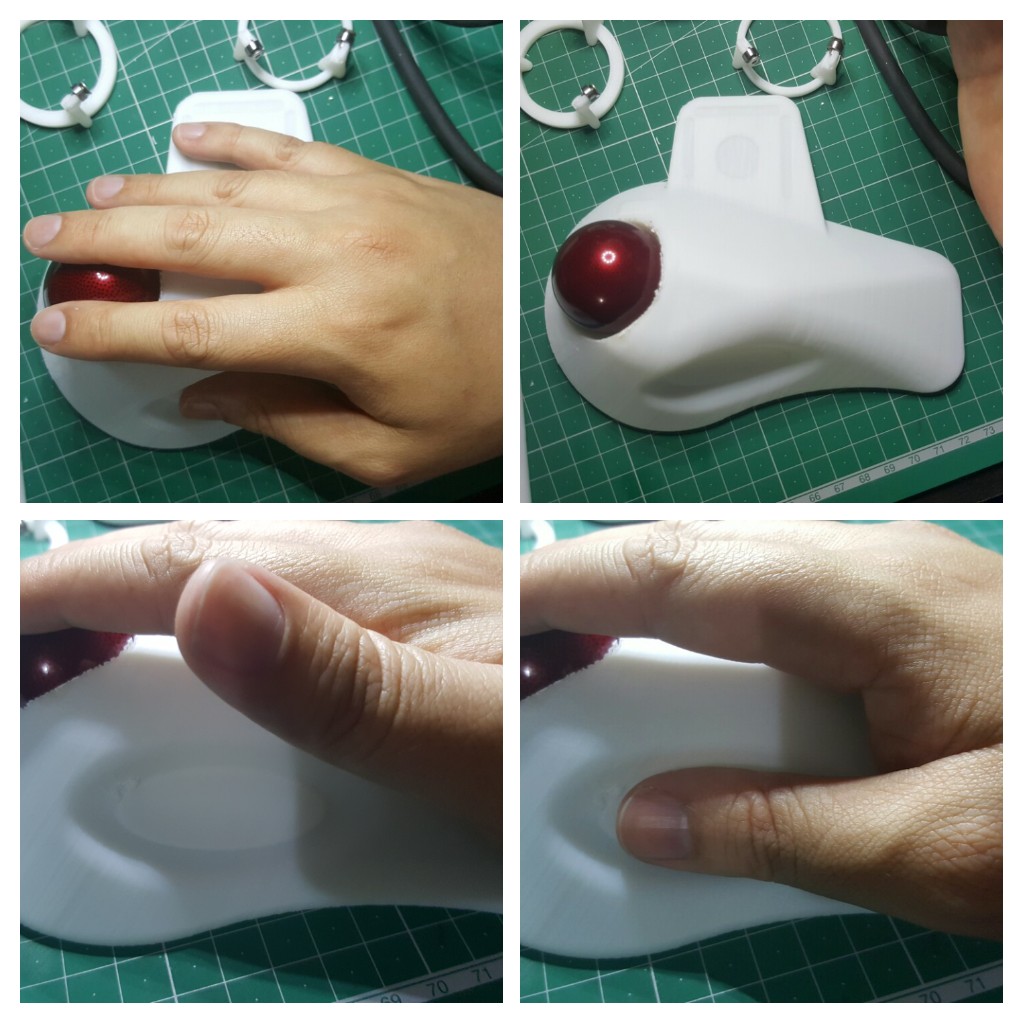
The final fitting confirms the form, shape and placement of the buttons.  Yay… now I just have to wait for the electronics to arrive in the mail and onto the next step.  Less 3D printing time, uploading and cloud processing time, the actual design effort took roughly an hour and demonstrates how easily a simple child’s toy can be used in an engineering context.

Final pre-electronics tweaking render

Once I get the electronics, there will probably be more tweaking to be done to the model to fit the items inside but I consider the physical form to be ‘almost complete’ for now.  The observative amongst you would have noticed the new ‘wing’ in the final render where my little finger is… let’s just say I’m prone to scope creeping my projects… *cough it might be provision for a 3D gesture controller*

If there is interest, I’ll write up on the electronics design too…

HTC Sense UI on HTC Magic

Well I’ve installed the official HTC Magic update with the new Sense UI a week ago and I have to say I’m pleasant amazed at HTC’s work with the Sense UI and how responsive the update is.  Just purely love it.

IMGP0909

Other than the annoying thing that I couldn’t download it using Firefox or Linux, and that you need to update using Windows and HTC Sync… its awesome.  Even though it’s a Taiwan ChungHwa ROM, there is an English option luckily 🙂

In addition to the Sense UI and its wonderful feature set, another interesting but hidden away feature is “Mobile Internet Sharing”, aka tethering!  Azilink is now redundant with this new firmware, and honestly I was getting annoyed with Azilink’s performance and constant dropping out.  On Ubuntu at least, it was ‘plug-and-play’ without any other tricks.  Awesome.

Now I’m not so jealous about all the HTC Hero’s my friends and relatives have…

Photos (pretty boring) after the break.

Continue reading “HTC Sense UI on HTC Magic”

EasySync USB-CAN Bus Adapter – Works great in Ubuntu after some fiddling

Neat little package
Neat little package

The toys just keep coming in!  Another one of those wallet killing impulsive orders whilst I was sick in bed last week just arrived today, a USB-CAN bus converter module by EasySync that promises a great interface and should work in Linux!  This will give a little bump start to my Mazda CAN Bus / mChumby projects.

Note : EasySync UK’s online form doesn’t allow international shipping but a short E-mail or two managed that.  There is a US subsidiary with US and international shipping, but the international shipping rates on the US site is plain ridiculous [$68USD to ship a $88 device to Australia].

Note 2 : I hear the interface is mimicking the Lawicel CAN-USB interface…only hearsay…

Plugged it in – didn’t work.  Doh!  Took a peek at the manual and website, nothing on Linux other than “Linux drivers provided”… So much for the marketing material, guess I have to try make it work myself.  (Yes I got it working, read on for the quick run-down post aimed at helping others)

Continue reading “EasySync USB-CAN Bus Adapter – Works great in Ubuntu after some fiddling”

Citrix Linux Client 64bit (AMD64) for Ubuntu Jaunty 9.04

This post is record to help myself if I ever decide to do a fresh install again, so it might be a bit messy.  (Posting helps me keep these untitled files off my hard-drive hehe)

Download the Citrix Linux client (v11) from :-
http://www.citrix.com/English/ss/downloads/index.asp
URL mileage may vary, go back to the home page if its not right.

Unpack the tarball and install… e.g.

tar -xvzf linuxx86-11.0.140395.tar.gz
sudo ./setupwfc

Might be missing a ‘cd’ step here obviously…
If run using sudo, default installs to /usr/lib/ICAClient

Confirm it doesn’t run because of libmotif

/usr/lib/ICAClient/wfcmgr
/usr/lib/ICAClient/wfcmgr: error while loading shared libraries: libXm.so.4: cannot open shared object file: No such file or directory

Download a 32bit (i386) Open Motif package from :-
http://ftp.ubuntu.com/ubuntu/pool/multiverse/o/openmotif/

Rip out libXm from it…

$ dpkg -x libmotif3_2.2.3-4_i386.deb ./tmp
$ cd ./tmp
~/tmp$ cd usr/lib
~/tmp/usr/lib$ ls
libMrm.so.3      libUil.so.3      libXm.so.3      X11
libMrm.so.3.0.2  libUil.so.3.0.2  libXm.so.3.0.2
~/tmp/usr/lib$ sudo cp libXm.so.3 /usr/lib32/
~/tmp/usr/lib$ cd /usr/lib32
/usr/lib32$ sudo ln -s libXm.so.3 libXm.so.4

Then this stupid error…
You have not chosen to trust “Equifax Secure Global eBusiness CA-1”, the issuer of the servers security certificate (SSL error 61).

Download the root 1 (Base64) Cert from :-
http://www.geotrust.com/resources/root-certificates/index.html
Change the extension to .crt
Copy it to Citrix Installation Path/ICAClient/keystore/cacerts

$ mv Equifax_Secure_Global_eBusiness_CA-1.cer Equifax_Secure_Global_eBusiness_CA-1.crt
$ sudo cp Equifax_Secure_Global_eBusiness_CA-1.crt /usr/lib/ICAClient/keystore/cacerts/

Set firefox to open the ICA with /usr/lib/ICAClient/wfica

Voila…

Need to tidy this post up in the future

Ubuntu 9.04 – Jaunty Jackalope AMD64 (64 bit)

I’ve finally made the jump and using the AMD64 version of Ubuntu as my primary installation.  There are a couple of tricky things to deal with, primarily with closed sourced applications such as Adobe Flash Plugin and Skype which are two applications I need to use.

How to install Adobe Flash Plugin 64 Bit for Ubuntu 9.04

A lot of the tutorials/guides online will tell you to use nspluginwrapper or similar.  Adobe has released an ‘alpha’ version of their 64 bit player which is pretty stable so far…

Download it from :-http://labs.adobe.com/downloads/flashplayer10.html

Unpack the archive and copy the only file to the Firefox plugins folder in ‘/usr/lib/firefox-addons/plugins‘ :-

sudo cp libflashplayer.so /usr/lib/firefox-addons/plugins

How to install Skype 64 bit for Ubuntu 9.04

You would think you could just go to www.skype.com and ask for a download and it’ll be like the Adobe site detecting that you have a 64 bit system right?  Wrong (at time of writing).  Annoyingly that’ll just let you download an i386 package!

You could manually remedy this by downloading the AMD64 .deb package from :-
http://www.skype.com/go/getskype-linux-ubuntu-amd64

Everything else?

So far the respositories have been kind to me… but i’ll update if I run into any other troubles 🙂

Voila happy 64 bit Ubuntu’ing.

MChumby – Interface Design

Working a 70 hour week dampened my enthusiasm for the MChumby but I managed to scrape a couple of hours today to try my hand with HaXe + Flash to prototype the Chumby Interface.

Test of revised layout

A few interesting tidbits were learned from the experiments :-

  1. HaXe + Geany are great for developing flash widgets for the Chumby
  2. Gnash doesn’t render the same as Linux Adobe Flash
  3. Chumby renders the same as Adobe Flash
  4. Text vertical alignment in flash is crap

A bit of background and a demo video of the widget on the Chumby after the break.

Continue reading “MChumby – Interface Design”

mChumby – Mazda/Madox Chumby

It’s taken me a while to officially start this project.  When I first bought my Mazda 3 I had envisaged making my own speedometer based off the Mazda CAN Bus but somehow never quite got around to it.

I even ended up buying 2 Chumbies for the purpose of hacking one and developing the same speedo (The chumby is such a great alarm clock I couldn’t live without one…).

There has been quite a bit of interest in the comments for source code/information etc etc.  So now I’m officially starting the mChumby project!  This first post is basically a brainstorming session write-up or a mini requirements specification on myself.  Feel free to comment on any ideas/improvements you think I can make.

(This post seems too wordy without a photo but I’m just too lazy)

Continue reading “mChumby – Mazda/Madox Chumby”

Essential Free Software for a Windows Install

Yesterday I went and bought a laptop for my dad to learn how to use computers and the internet.  A base install of windows is not functional nor safe enough to let loose on the internet without some additional software.  Being an avid fan of things that are free, I went and downloaded the latest versions of free software that I thought would be essential for this new PC.

I hope this post is useful for other people, but its really a lazy way of me bookmarking everything in-case I have to do it again.

Continue reading “Essential Free Software for a Windows Install”

Rapid Prototyping – Mechanical Iris Diaphragm

Shapeways had a little Halloween special last month where they offered 66% off on their new black detail material. Always wanting to try out some 3D printing for myself, this offer reeled me in!
So I set out to design something in the shortest amount of time and yet would still give me a good ‘feel’ of what 3D printing is capable of today. The time constraint was probably also due to the fact I read about the offer at midnight and wanted to send it to print before I sleep 🙂 Result? Concept, Design, Upload, Ordered all within 2 hours!

Shapeways had a little Halloween special last month where they offered 66% off on their new black detail material.  Always wanting to try out some 3D printing for myself, this offer reeled me in!
So I set out to design something in the shortest amount of time and yet would still give me a good ‘feel’ of what 3D printing is capable of today.  The time constraint was probably also due to the fact I read about the offer at midnight and wanted to send it to print before I sleep 🙂  Result? Concept, Design, Upload, Ordered all within 2 hours!

Concept

The concept is a mechanical iris diaphragm, similar to those in cameras but on a much larger scale.  If you’re a Stargate fan, you would have think this is a much SMALLER scale version of the Stargate iris, then I would say that only has 20 blades…mine has 24!

There’s not much design detail out on the web, or at least no design drawings to plagiarise but I’ve seen enough stargate to try design something up myself…

Continue reading “Rapid Prototyping – Mechanical Iris Diaphragm”